PXE Server – PXE, an abbreviation of the preboot execution environment, allows us to deploy operating systems on multiple systems automatically at a time in the network. Also, the PXE server helps you to install an OS in a remote system that doesn’t have many options for CD/DVD or USB drives. Now, let start how to setup PXE Network Boot server in CentOS.
DNSMASQ provides DNS and DHCP services, Syslinux package which provides bootloaders for network booting, TFTP-Server, which makes bootable images available to be downloaded via the network using Trivial File Transfer Protocol (TFTP) and VSFTPD Server which will host the local mounted mirrored DVD image
Install DnsMasq Server and configure
use the following command to install DNSMASQ daemon.
# yum install dnsmasq
DNSMASQ main default configuration file located in /etc directory is self-explanatory but intends to be quite difficult to edit, do to its highly commented explanations.
First make sure you backup this file in case you need to review it later and, then, create a new blank configuration file using your favorite text editor by issuing the following commands.
# mv /etc/dnsmasq.conf /etc/dnsmasq.conf.org
# vim /etc/dnsmasq.conf
Copy and paste the following example configurations on dnsmasq.conf file and make sure your network settings accordingly.
interface=ens192,lo
#bind-interfaces
domain=pxe.eng.cloudkb.com
# DHCP range-leases
dhcp-range= ens192,10.2.150.1,10.2.152.254,255.255.240.0,1h
# PXE
dhcp-boot=pxelinux.0,pxeserver,10.2.151.199
# Gateway
dhcp-option=3,10.2.144.1
# DNS
dhcp-option=6,10.2.0.1, 8.8.8.8
server=10.2.0.1
# Broadcast Address
dhcp-option=28,10.0.0.255
# NTP Server
dhcp-option=42,0.0.0.0
pxe-prompt=”Press F8 for menu.”, 60
pxe-service=x86PC, “Install CentOS 7 from network server 10.2.151.199”, pxelinux
enable-tftp
tftp-root=/var/lib/tftpboot
The statements that you need to change are followed:
interface – Interfaces that the server should listen and provide services.
bind-interfaces – Uncomment to bind only on this interface.
domain – Replace it with your domain name.
dhcp-range – Replace it with IP range defined by your network mask on this segment.
dhcp-boot – Replace the IP statement with your interface IP Address.
dhcp-option=3,10.2.144.1 – Replace the IP Address with your network segment Gateway.
dhcp-option=6,10.2.0.1 – Replace the IP Address with your DNS Server IP – several DNS IPs can be defined.
server=8.8.4.4 – Put your DNS forwarders IPs Addresses.
dhcp-option=28,10.0.0.255 – Replace the IP Address with network broadcast address –optionally.
dhcp-option=42,0.0.0.0 – Put your network time servers – optionally (0.0.0.0 Address is for self-reference).
pxe-prompt – Leave it as default – means to hit F8 key for entering menu 60 with seconds wait time..
pxe=service – Use x86PC for 32-bit/64-bit architectures and enter a menu description prompt under string quotes. Other values types can be: PC98, IA64_EFI, Alpha, Arc_x86, Intel_Lean_Client, IA32_EFI, BC_EFI, Xscale_EFI and X86-64_EFI.
enable-tftp – Enables the build-in TFTP server.
tftp-root – Use /var/lib/tftpboot – the location for all netbooting files.
SYSLINUX Bootloaders Installation
Syslinux is a collection of boot loaders capable of booting from drives, CDs, and over the network via PXE.
# yum install syslinux
The PXE bootloaders files reside in /usr/share/syslinux absolute system path, so you can check it by listing this path content.
# ls /usr/share/syslinux
TFTP-Server Installation
Trivial File Transfer Protocol (TFTP) is a simple lockstep File Transfer Protocol that allows a client to get a file from or put a file onto a remote host. One of its primary uses is in the early stages of nodes PXEBOOT from a local area network.
# yum install tftp-server
Now, copy all SYSLINUX bootloders packages from the above listed location to /var/lib/tftpboot
# cp -r /usr/share/syslinux/* /var/lib/tftpboot
PXE Server Configuration Setup
The PXE Server reads its configuration from a group of specific files (GUID files – first, MAC files – next, Default file – last) hosted in a folder called pxelinux.cfg.
Create a directory pxelinux.cfg and update the default file with below example config.
# mkdir /var/lib/tftpboot/pxelinux.cfg
# touch /var/lib/tftpboot/pxelinux.cfg/default
# vim /var/lib/tftpboot/pxelinux.cfg/default
default menu.c32
prompt 0
timeout 300
ONTIMEOUT local
menu title ########## PXE Boot Menu ##########
label 1
menu label ^1) Install CentOS 7 x64 with Local Repo
kernel centos7/vmlinuz
append initrd=centos7/initrd.img method=ftp://10.2.151.199/pub devfs=nomount
label 2
menu label ^2) Install CentOS 7 x64 with http://mirror.centos.org Repo
kernel centos7/vmlinuz
append initrd=centos7/initrd.img method=http://mirror.centos.org/centos/7/os/x86_64/ devfs=nomount ip=dhcp
label 3
menu label ^4) Install ESXI6 with local repo
kernel esxi650/mboot.c32
append esxi650/boot.cfg method=ftp://10.2.151.199/pub devfs=nomount
label 4
menu label ^4) Boot from local drive
Update CentOS Boot Images to PXE Server
It would require to copy CentOS kernel and initrd files from the ISO. You can directly attach ISO CD and copy the files or download the ISO file to your local machine and mount to copy the files.
# mount -o loop /dev/cdrom /mnt
# ls /mnt
Download ISO to your local and copy the files.
# cd /opt/
# wget http://mirrors.xservers.ro/centos/7.2.1511/isos/x86_64/CentOS-7-x86_64-DVD-1511.iso
# mount -o loop /opt/CentOS-7-x86_64-DVD-1511.iso /mnt
Now, copy CentOS bootable kernel and initrd images to the tftpboot directory
# mkdir /var/lib/tftpboot/centos
# cp /mnt/images/pxeboot/vmlinuz /var/lib/tftpboot/centos
# cp /mnt/images/pxeboot/initrd.img /var/lib/tftpboot/centos
Setup FTP Local Mirror to keep the image sources
This is optional setup to boot images from your local FTP mirrors. It is also possible to configure VNC server on CentOS and configure the PXE boot.
# yum install vsftpd
# cp -r /mnt/* /var/ftp/pub/
# chmod -R 755 /var/ftp/pub
Unmount once you’re copied.
# umount /mnt
Start services
# systemctl start dnsmasq
# systemctl status dnsmasq
# systemctl start vsftpd
# systemctl status vsftpd
# systemctl enable dnsmasq
# systemctl enable vsftpd
Verify FTP local mirror network path in your browser. If it is not accessible, make sure port has enabled in your firewall.
ftp://10.2.151.199/pub
Enable firewall ports
# firewall-cmd –add-service=ftp –permanent ## Port 21
# firewall-cmd –add-service=dns –permanent ## Port 53
# firewall-cmd –add-service=dhcp –permanent ## Port 67
# firewall-cmd –add-port=69/udp –permanent ## Port for TFTP
# firewall-cmd –add-port=4011/udp –permanent ## Port for ProxyDHCP
# firewall-cmd –reload ## Apply rules
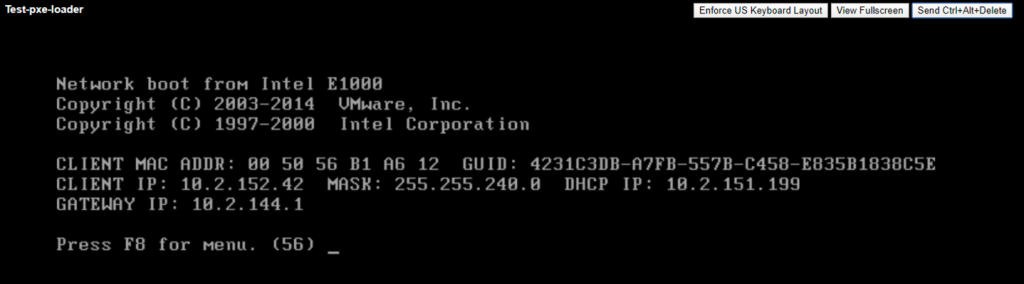
Verify the PXE boot from your client
Make sure your client machine has enabled in BIOS as Network Boot as primary boot device. In order to choose network booting. After first PXE prompt appears, press F8 key to enter presentation and then hit Enter key to proceed forward to PXE menu.
Once you have reached PXE menu, hit Enter key and continue with the installation

Now, select your variant and hit enter to continue the installation. That’s it.


