AWS Site-to-Site VPN allows secured connectivity between AWS resources and the on-premises network such as a data center or a branch office.
AWS Site-to-Site VPN provides two tunnels per connection, using the virtual private gateway or the AWS Transit Gateway. The virtual private gateway provides connectivity to a single Amazon Virtual Private Cloud (Amazon VPC) in a Region. The transit gateway provides connectivity to multiple Amazon VPCs in a region as well as to the internet.
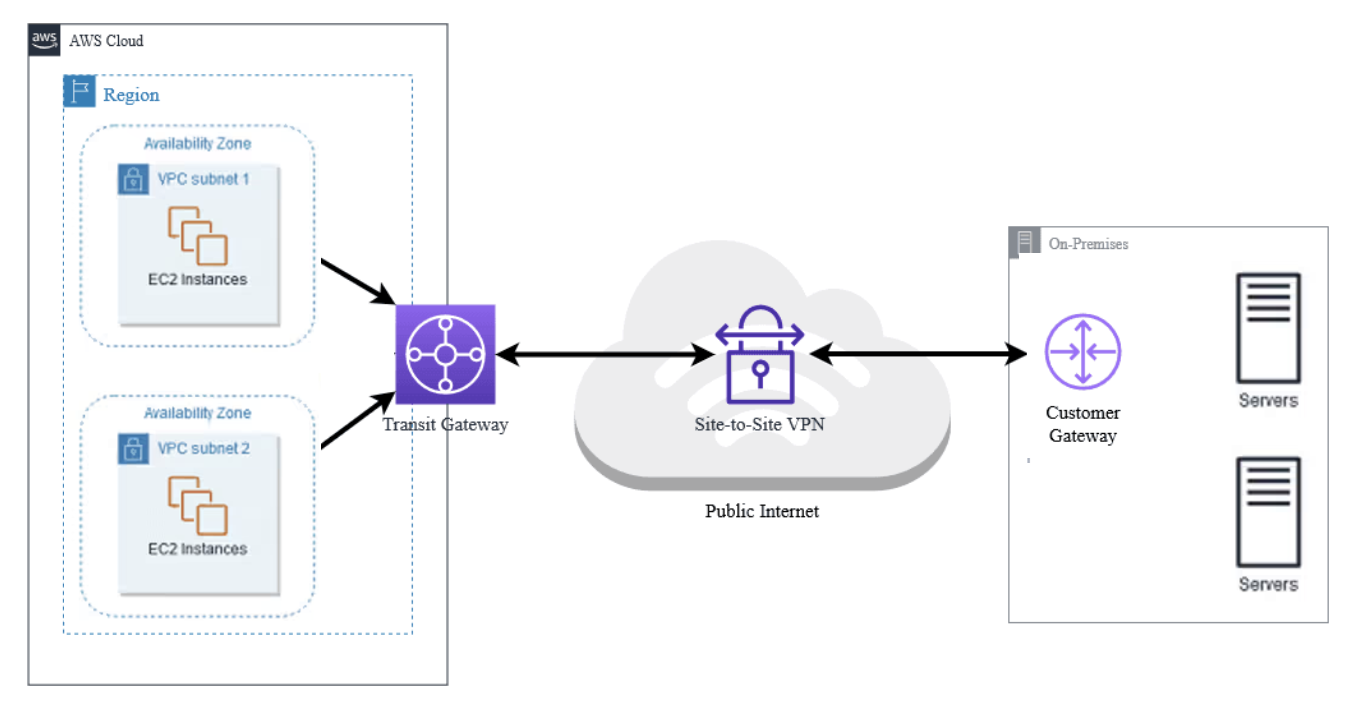
The setup basically wants to connect the AWS VPC network to our on-prem Paloalto firewall. I have used the below steps to complete the entire site to site VPN connection.
VPC in AWS with Private and Public Subnet.
We have created a VPC with private and public subnets. The Internet access to the private subnet is disabled within vpc and public subnet has Internet access right out of the AWS cloud.
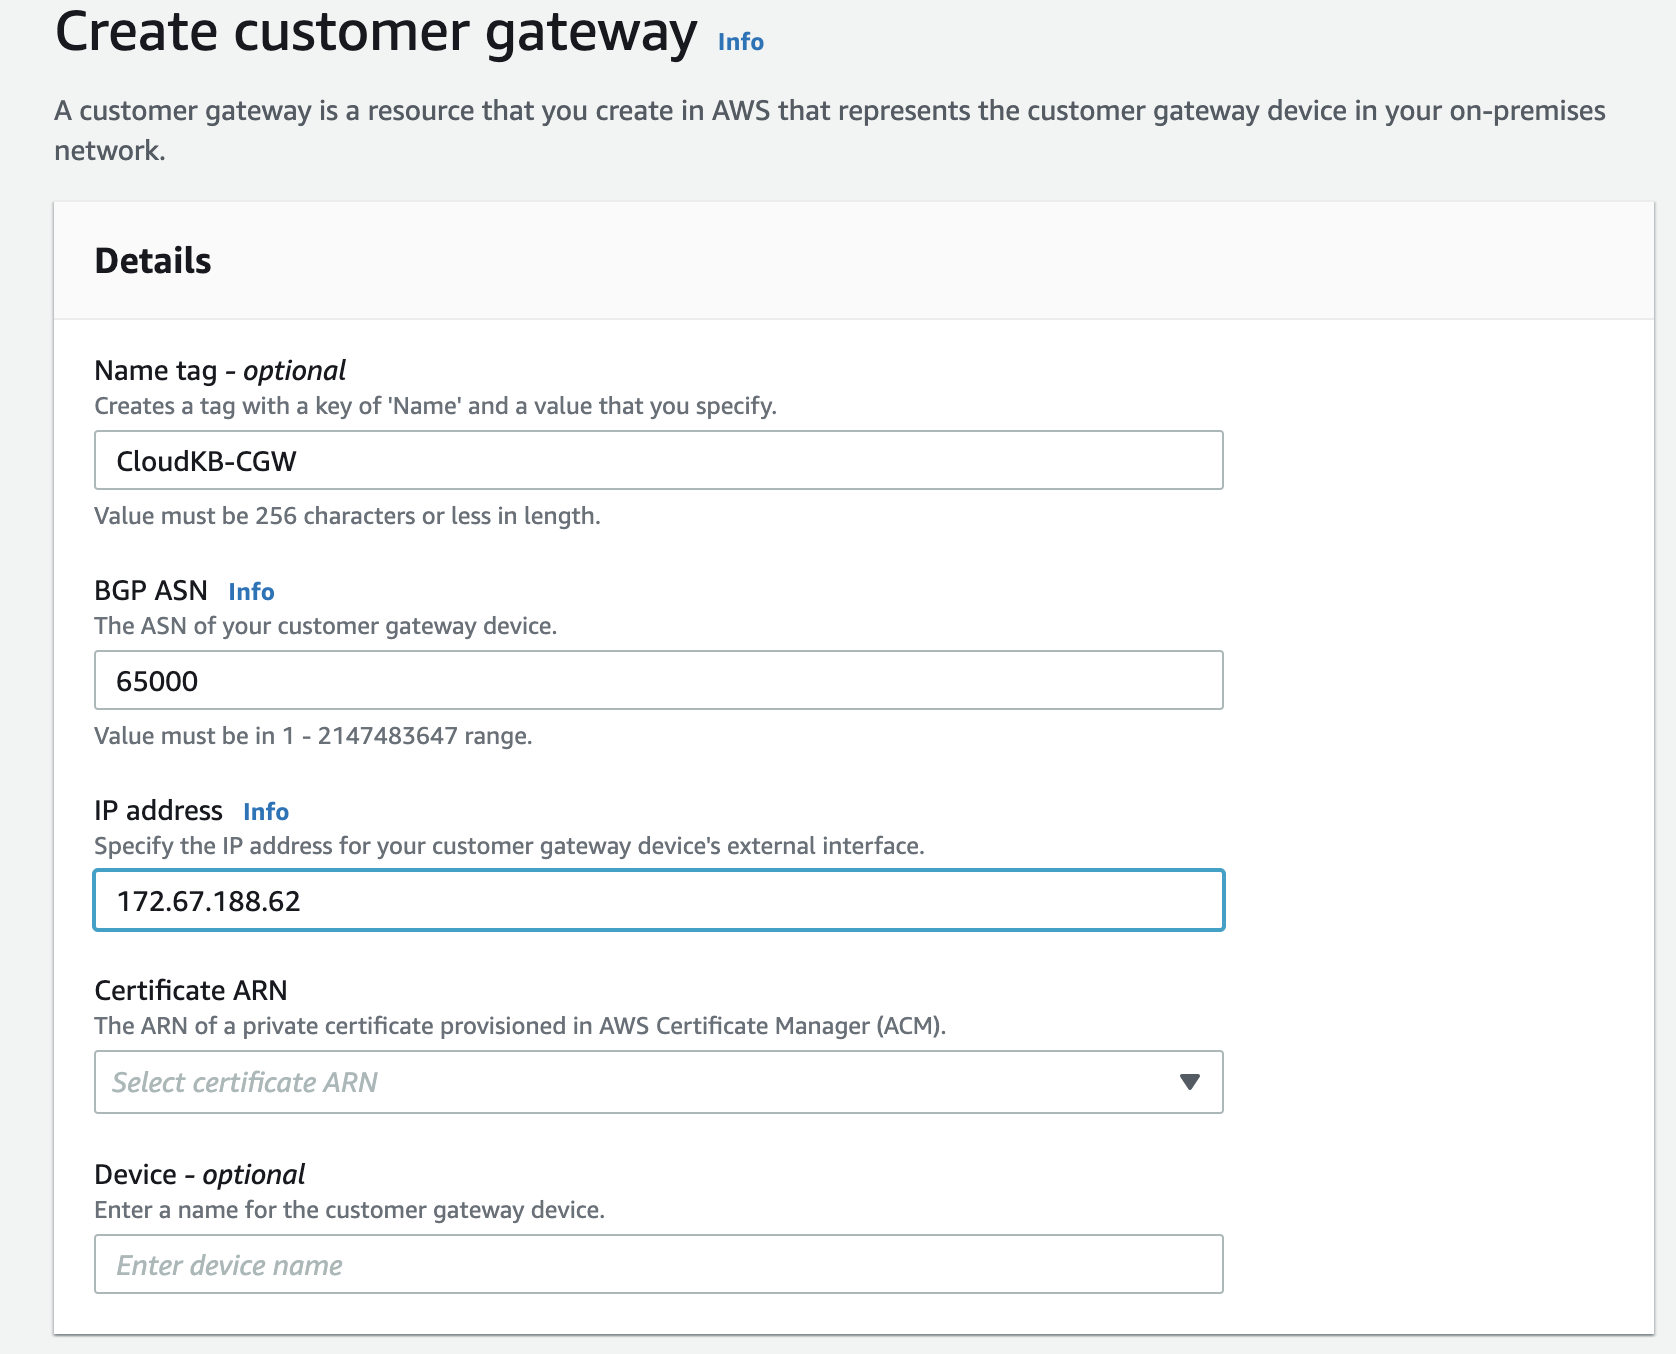
Create Customer Gateway (CGW)
Customer Gateway (CGW) represents a physical device or a software application that is managed in your on-premises network.
- Get the Public IP of the Customer Gateway.
The IP address may be connected to the internet directly, or it may be connected to a NAT device, and if the IPsec device might be behind the NAT device. In that case you need to get the public IP address of your NAT device.
- Goto VPC console.
- Under Virtual Private Network, Click on Customer Gateways.
- Click on Create customer gateway.
- Enter a name for your CGW.
- IP Address: Enter the Public IP address that you received from the on-prem network engineer.
- Certificate ARN: You need to select this when you use Certificate-based IPsec VPN. However, in most deployments, we choose the pre-shared key so you can leave the Certificate ARN settings.
- Device: Enter the name of your on-prem network device, For example, Palo Alto, Cisco ASA or Fortinet etc, this is again optional though.
Create Transit Gateway
A transit gateway is a network transit hub that you can use to interconnect your virtual private clouds (VPCs) and on-premises networks.
- Goto VPC console.
- Click Transit gateways
- Click Create transit gateway
- set to Name
- Enable DNS support, Default route table association, Default route table propagation and Configure cross-account sharing options if you want.
- CIDR – optional
Transit gateway attachment
A transit gateway enables you to attach VPCs and VPN connections in the same Region and route traffic between them. A transit gateway works across AWS accounts, and you can use AWS RAM to share your transit gateway with other accounts.
- Click Transit gateway attachments
- Click Create transit gateway attachment
- set to Name
- Transit gateway ID ( Select your Transit Gateway)
- Attachment type (Select VPC)
- VPC ID ( choose your VPC)
Create a Site-to-Site VPN connection
With the CGW and the TGW that we created, we will now create the site-to-site VPN on our AWS VPC.
- Under Virtual Private Networks.
- Click Site-to-Site VPN connections
- Create VPN connection
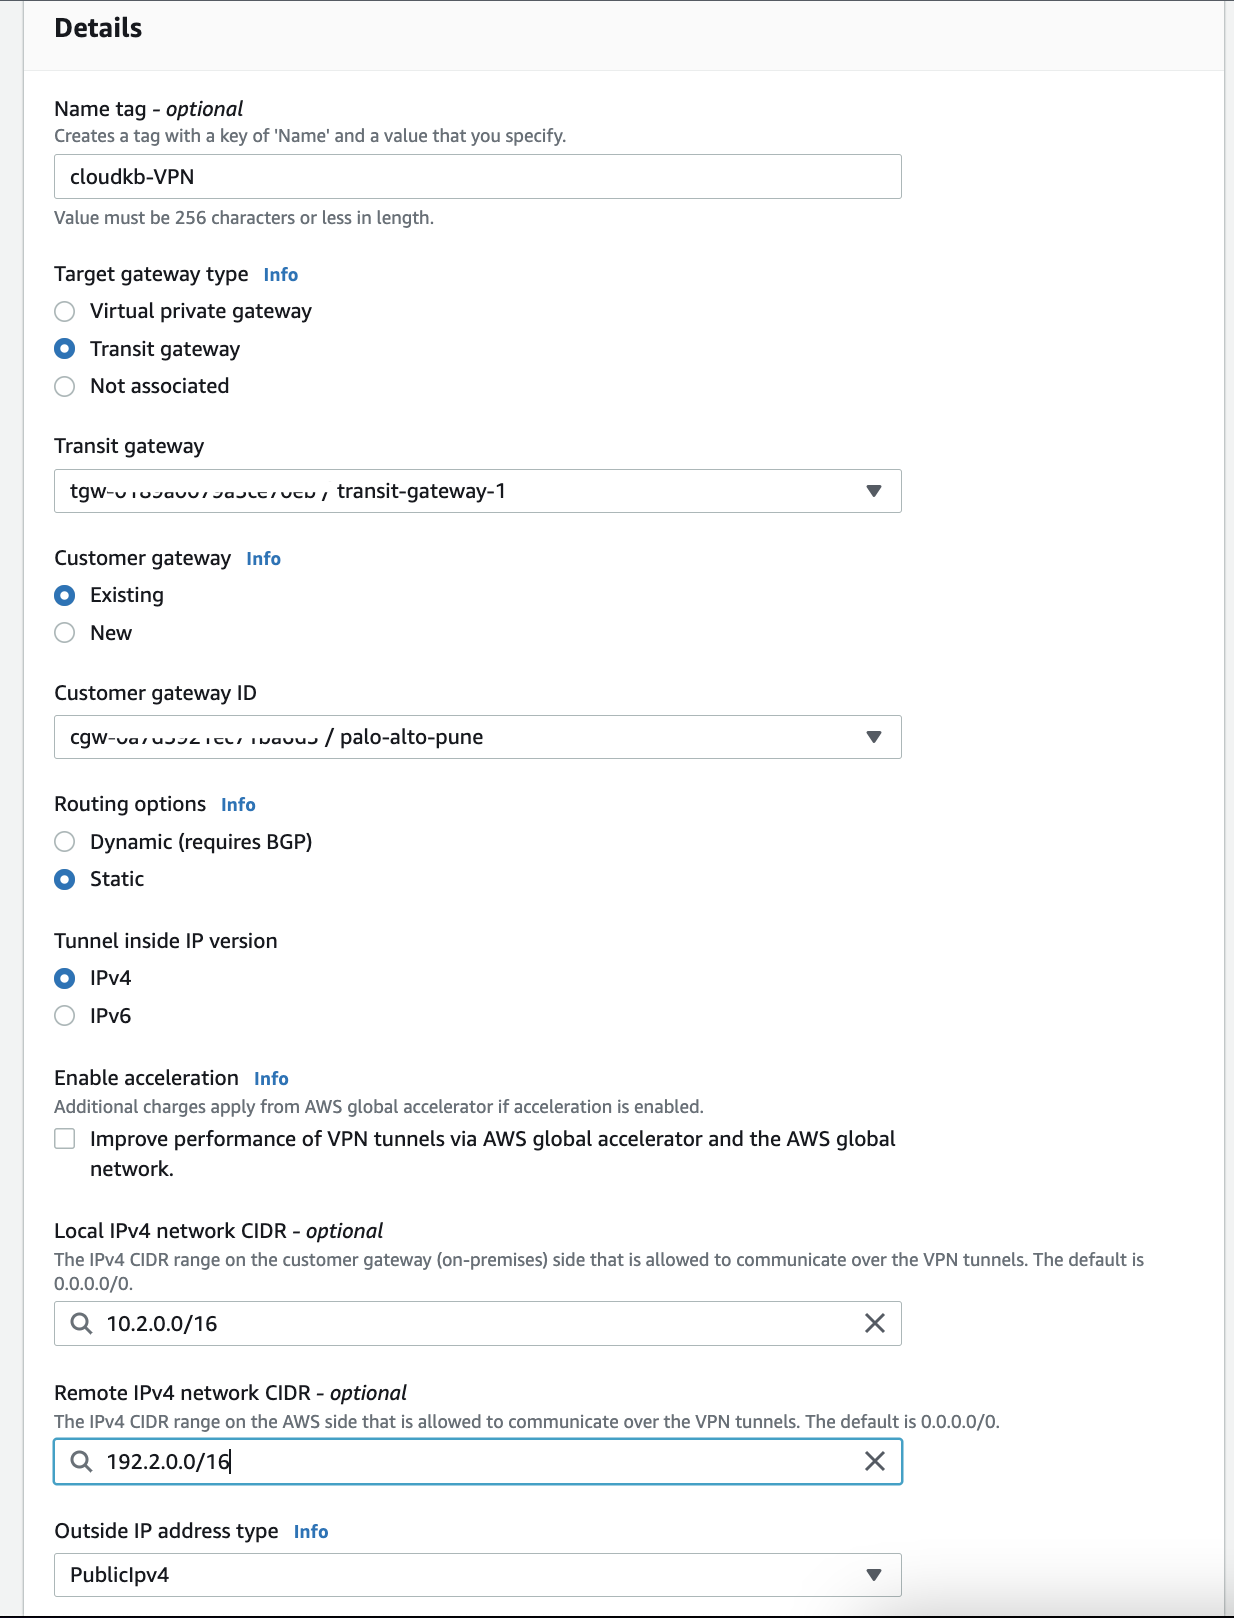
- set to Name
- Target gateway type
- Click Transit gateway
- Select your transit gateway
- Customer gateway
- Click Existing and choose your CGW
- Routing options ( note : we used static routing to configure the firewall, Dynamic required some BGP configurations.)
- Tunnel inside IP version ( IPv4)
- Local IPv4 network CIDR – optional
- Remote IPv4 network CIDR – optional
- Outside IP address type (PublicIpv4)
- Click Create VPN connection
- Under Tunnel Options, you can leave everything default. In case if you want to add your pre-shared key, you can do that here.
As you can see, there are two tunnel information, which means AWS will create two tunnels to your on-prem network. One is the primary and then the secondary.
Update the route propagation on the routing table.
We need to make sure when the tunnel comes up. The remote route propagated automatically into the routing table. This means that route 10.2.1.0/24 and 192.2.0.0/16 should appear on both private and public subnet routing tables pointing to the VPN gateway.
- Click Transit gateway route tables
- Create transit gateway route table
- set to Name
- Transit gateway ID ( select your transit gateway)
- Select Route Table
- click Routes Tab
- Create static route
- 10.2.0.0/16 ( select your transit gateway attachment)
- 192.2.0.0/16 ( select your transit gateway attachment)
Go back to the Virtual Private Network.
Click on site to site VPN connections.
Select your VPN and Click Tunnel details.
You should see the VPN Tunnel state is up or down.
You can create some EC2 instances and attach them to two different Transit Gateway Route tables and then propagate routes across and test the access. There are various use cases such as a shared services VPC having access to all other VPCs across different environments, providing access from Customer VPCs towards the Management or Infrastructure VPC for accessing various services.
We have completed the AWS site-to-site VPN configuration.


