You can save the disk space on the datastore, and the best advice is to convert thick provisioned to thin on VMware ESXi. All depend on your deployment requirements, just verify the usage and convert the disk format only if it is required. Before doing anything, read the VMware disk types.
VMware disk types
Thick Provision Lazy Zeroed: is a disk that takes all of its space at the time of its creation, but this space may contain some old data on the physical media. This old data is not erased or written over, so it needs to be “zeroed out” before new data can be written to the blocks. This type of disk can be created more quickly, but its performance will be lower for the first writes due to the increased IOPS (input/output operations per second) for new blocks.
Thick Provision Eager Zeroed: is a disk that gets all of the required space still at the time of its creation, and the space is wiped clean of any previous data on the physical media. Creating eager zeroed disks takes longer, because zeroes are written to the entire disk, but their performance is faster during the first writes. This sub-type of thick-provisioned virtual disk supports clustering features, such as fault tolerance.
Thin Provision: Thin provisioning is another type of storage pre-allocation. A thin-provisioned virtual disk consumes only the space that it needs initially and grows with time according to demand.
Note: Before proceed, VMware recommends that you have a valid backup of the virtual machine and enough space to convert the virtual machine’s disk(s) from thin to thick.
How to convert VMware thick based volumes to thin
Convert using Inflate option
Verify VMware hard disk type:
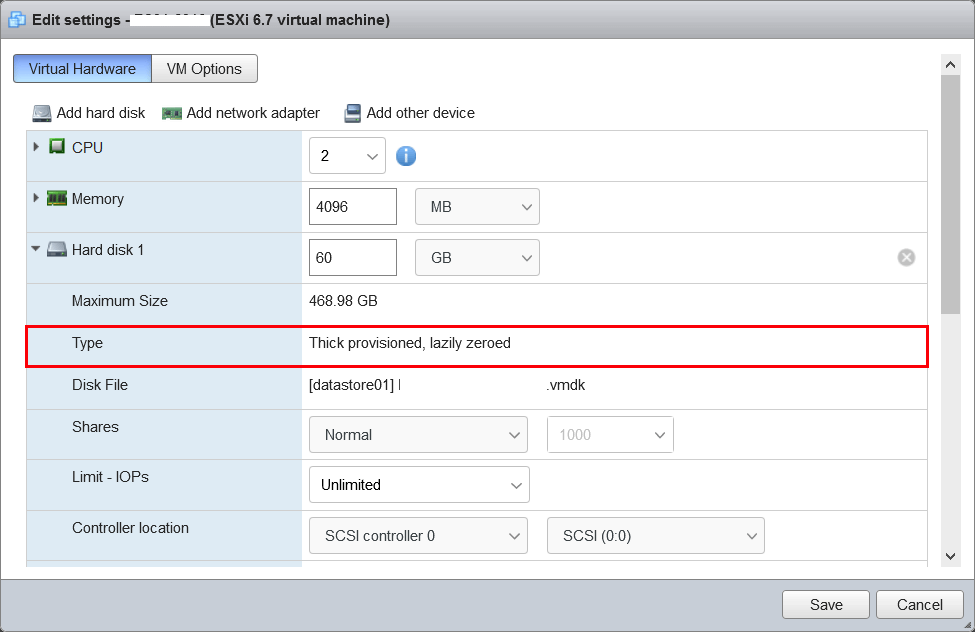
- Log in to VMware ESXi. Click in the left menu on Virtual Machines. In the Virtual Machine list view, right-click on the VM and click Edit Settings.
Expand the Hard disk and check the Type.
- Shut down VM
Shut down the VM properly
- Navigate to the datastore where the VM/ VM disk resides that was under Files
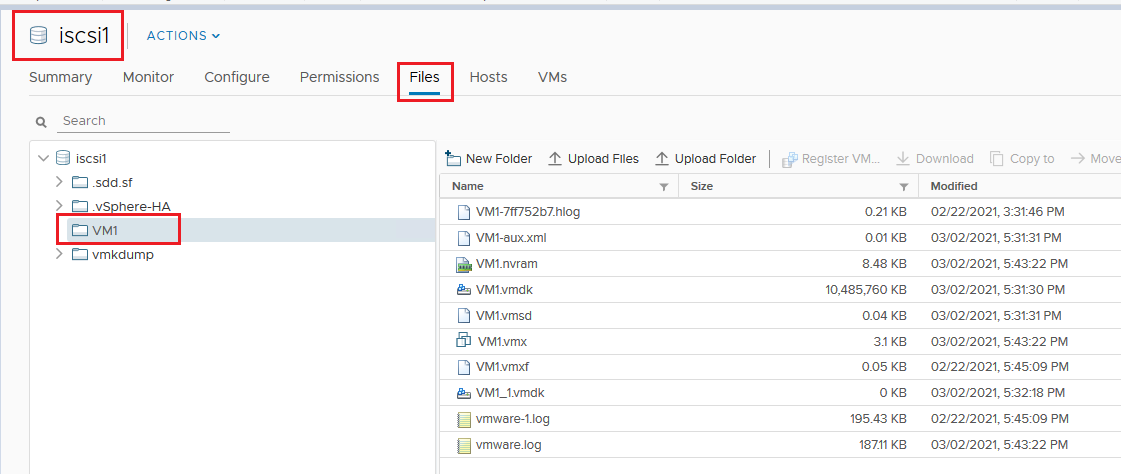
- Select the disk VMDK, and in the status bar above, you should find the Inflate option. The Inflate option converts the disk to thick provisioned.

- Once you’ve selected the inflate option, you should be seeing a task getting created for the vmdk inflation at the bottom in the Recent Tasks tab. This task usually takes sometime to complete depending on the performance of the array.
- After the inflation task is completed, verify disk format again and do reload the .vmx file if it is not reflecting.
Notes:
- If the Inflate option is grayed out, it indicates that the virtual machine is not powered off or that it is not thin provisioned.
- There should be no snapshots and the conversion is performed on the base disk.
Convert using VMware Storage vMotion
To convert a virtual machine base disk from thick to thin provisioning by changing the datastore and performing storage vMotion:
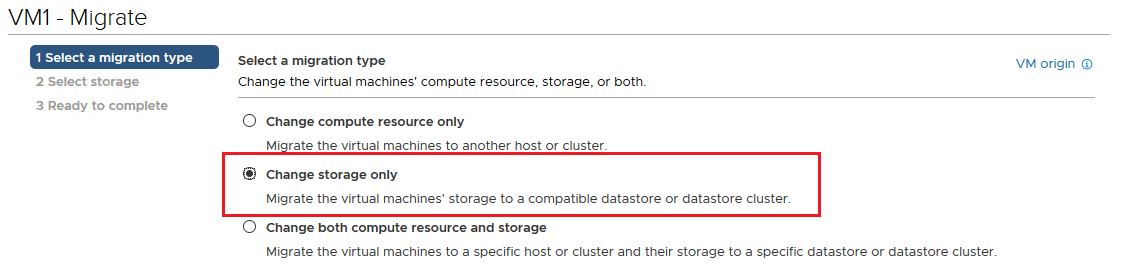
- Right-click the virtual machine and select Migrate.
- Select Change storage only and click Next.
- In the next window, select the option configure per disk.
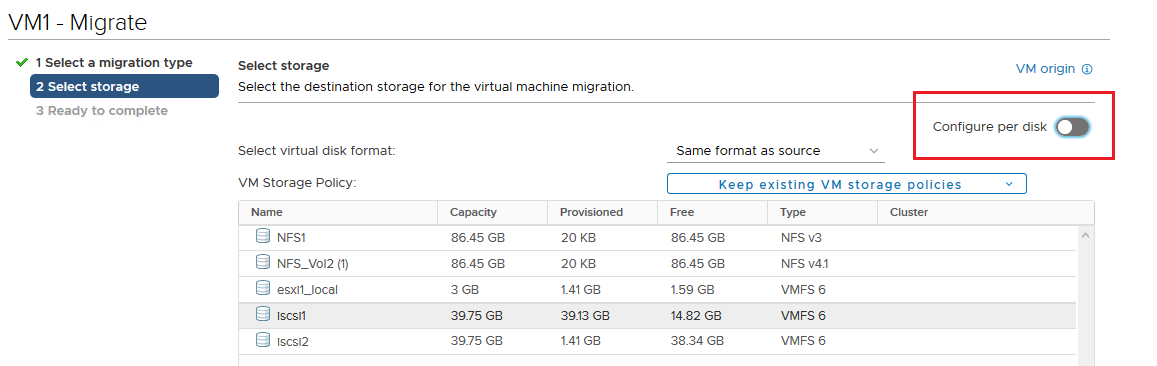
- Select the disk in question which needs to undergo the modification.
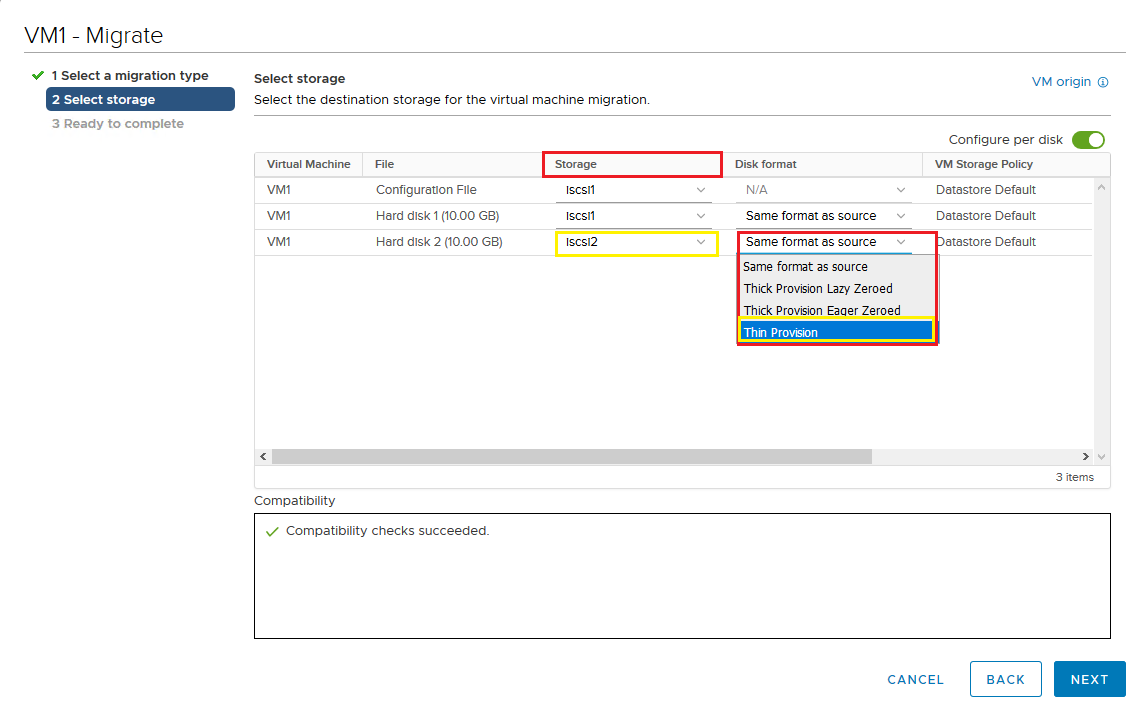
- Under Storage category select the destination datastore and under the Disk Format option select Thin Provision.
- Validate the required VM Storage Policy and click Next.
- Review the information on the Review Selections page and click Finish.
Convert using VMware ESXi command line
- SSH into the host with the application Putty.
- Navigate to the VM folder
- [root@localhost:/vmfs/volumes/5e88aaf7-7ab335e2-4adc-1c697a0f86bd/vm-name1] ls -lh
rw——- 1 root root 60.0G Jan 5 22:04 vm-name1-flat.vmdk
-rw——- 1 root root 264.5K Jan 5 22:04 vm-name1.nvram
-rw——- 1 root root 450 Jan 5 21:58 vm-name1.vmdk
-rw-r–r– 1 root root 0 Jan 5 21:58 vm-name1.vmsd
-rwxr-xr-x 1 root root 3.2K Jan 5 22:04 vm-name1.vmx
-rw-r–r– 1 root root 226.5K Jan 5 22:04 vmware.log
- Clone the VMDK to a thin provisioned disk using vmkfstools
Use the command
# vmkfstools -i vm-name1.vmdk -d thin vm-name1-thin.vmdk
List the files in the directory and verify that two files are created: vm-name1.thin-flat.vdmk and vm-name1.thin.vmdk.
- Rename old flat file
Rename the old file with the command mv vm-name1-flat.vmdk vm-name1-flat.vmdk.old
- Rename new flat file
Rename the thin flat file with the command mv vm-name1-thin-flat.vmdk vm-name1-flat.vmdk.
- Now, go to the UI and Unregister VM from ESXi
This is necessary for the host to recognize the new disk type. Right-click VM > Unregister.
Click Yes.
Register VM in ESXi
- Click on Create / Register VM.
- Select Register an existing virtual machine. Click on Next.
- Open the VM vm-name1 and select the vm-name1.vmx file. Click Select.
- Click on Next.
- Click Finish.
Verify hard disk type using the previous steps.
- Start the VM
Start the VM and check that everything works as expected.
- Delete unnecessary VMDK files
Clean up and remove the files. Run the command rm vm-name1-thin.vmdk && rm vm-name1-flat.vmdk.old.


