Gitolite is small, simple, and powerful. the backend application managing the fiddly bits that you configure using Git. You can easily set up your own git server with as many users and as many repositories as can be stored in the space on your server.
First, let’s log in on the remote machine; the one you want to set up Gitolite on.
ssh root@git-serverThen install git:
sudo apt-get install git
sudo adduser git
sudo passwd -l git
It’s time to create the $HOME directory for the git user; then we will create SSH public key and adjust some permissions and directory ownership:
sudo ssh-keygen
sudo chmod 700 /home/git/.ssh
sudo chown -R git:git /home/git/
Let’s impersonate the git user, then clone and install Gitolite:
sudo su git -l
git clone https://github.com/sitaramc/gitolite ~/gitolite
mkdir ~/bin
~/gitolite/install -to ~/bin
Exit the git user shell and re-login to make the commands we just installed in ~/bin available to us.
Then setup Gitolite with your public key.
exit
sudo su git -l
gitolite setup -pk ~/.ssh/id_rsa.pub
exit
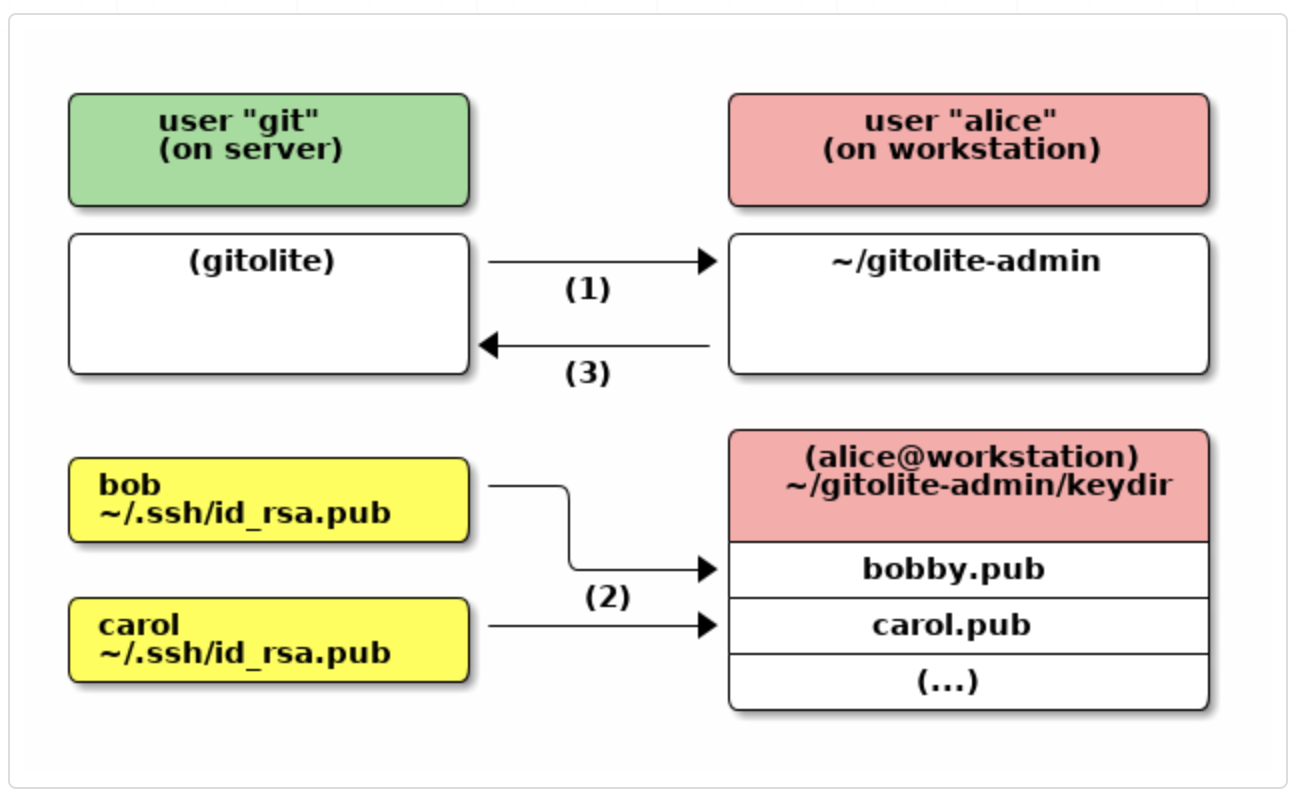
exitNow let’s clone the gitolite-admin master repo:
git clone git@git-server:gitolite-admin ~/gitolite-adminopen the ~/gitolite-admin/conf/gitolite.conf file and put these lines to create a new repo and permissions,
repo my-repo
      RW+ = user1
Move your public key to the below location.
cd ~/gitolite-admin/keydir
vi user1.pub
And paste your public key details.
After that you’ll need to commit and push those changes to the remote gitolite-admin repo:
cd ~/gitolite-admin/
git add .
git commit -m "Add new repo, keys, access"
git push
That’s it
Cloning the new repo
Log in to your local machine and cloning the new repo (make sure your key permission in gitolite.conf to pull repo from remote machine)
git clone git@git-server:my-repoNow you can add content to it and use git as usual.
Git Daemon
Next, we’ll set up a daemon serving repositories using the “Git” protocol. This is a common choice for fast, unauthenticated access to your Git data. Remember that since this is not an authenticated service, anything you serve over this protocol is public within its network.
In any case, the Git protocol is relatively easy to set up. Basically, you need to run this command in a daemonized manner:
$ git daemon --reuseaddr --base-path=/home/git/repositories/ /home/git/repositories/The –reuseaddr option allows the server to restart without waiting for old connections to time out.
If you’re running a firewall, you’ll also need to punch a hole in it at port 9418 on the box you’re setting this up on.
Since systemd is the most common init system among modern Linux distributions, you can use it for that purpose. Simply place a file in /etc/systemd/system/git-daemon.service with these contents:
[Unit]
Description=Start Git Daemon

[Service]
ExecStart=/usr/bin/git daemon --reuseaddr --base-path=/home/git/repositories/ /home/git/repositories/

Restart=always
RestartSec=500ms

StandardOutput=syslog
StandardError=syslog
SyslogIdentifier=git-daemon

User=git
Group=git

[Install]
WantedBy=multi-user.target
Finally, you’ll run systemctl enable git-daemon to automatically start the service on boot, and can start and stop the service with, respectively, systemctl start git-daemon and systemctl stop git-daemon.
Next, you have to tell Git which repositories to allow unauthenticated Git server-based access to. You can do this in each repository by creating a file named git-daemon-export-ok.
$ cd /home/git/repositories/<your repo>
$ touch git-daemon-export-ok
The presence of that file tells Git that it’s OK to serve this project without authentication.
Done, Access the repo via the below command.
$ git clone git://10.14.48.30/toolchain.git


