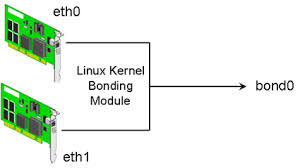
Network bonding refers to the combination of network interfaces on one host for redundancy and/or increased throughput. This helps in high availability of your network interface and offers performance improvement. Bonding is same as port trunking or teaming. Bonding allows you to aggregate multiple ports into a single group, effectively combining the bandwidth into a single connection. Bonding also allows you to create multi-gigabit pipes to transport traffic through the highest traffic areas of your network. We can look now to setup network bonding and Bridge on centos server.
Modes of Network bonding:
mode=1 (active-backup)
Active-backup policy: Only one slave in the bond is active. A different slave becomes active if, and only if, the active slave fails. The bond’s MAC address is externally visible on only one port (network adapter) to avoid confusing the switch. This mode provides fault tolerance. Theprimary option affects the behavior of this mode.
mode=2 (balance-xor)
XOR policy: Transmit based on [(source MAC address XOR’d with destination MAC address) modulo slave count]. This selects the same slave for each destination MAC address. This mode provides load balancing and fault tolerance.
mode=3 (broadcast)
Broadcast policy: transmits everything on all slave interfaces. This mode provides fault tolerance.
mode=4 (802.3ad)
IEEE 802.3ad Dynamic link aggregation. Creates aggregation groups that share the same speed and duplex settings. Utilizes all slaves in the active aggregator according to the 802.3ad specification.
Prerequisites:
Ethtool support in the base drivers for retrieving the speed and duplex of each slave. A switch that supports IEEE 802.3ad Dynamic link aggregation. Most switches will require some type of configuration to enable 802.3ad mode.
mode=5 (balance-tlb)
Adaptive transmit load balancing: channel bonding that does not require any special switch support. The outgoing traffic is distributed according to the current load (computed relative to the speed) on each slave. Incoming traffic is received by the current slave. If the receiving slave fails, another slave takes over the MAC address of the failed receiving slave.
Prerequisite: Ethtool support in the base drivers for retrieving the speed of each slave.
mode=6 (balance-alb)
Adaptive load balancing: includes balance-tlb plus receive load balancing (rlb) for IPV4 traffic, and does not require any special switch support. The receive load balancing is achieved by ARP negotiation. The bonding driver intercepts the ARP Replies sent by the local system on their way out and overwrites the source hardware address with the unique hardware address of one of the slaves in the bond such that different peers use different hardware addresses for the server.
Also you can use multiple bond interface but for that you must load the bonding module as many as you need.
Use the following steps to setup Network Bonding and Bridge on Centos server with two NICs.
vi /etc/modprobe.d/modprobe.conf
alias bond0 bonding
options bond0 miimon=80 mode=5
vi /etc/sysconfig/network-scripts/ifcfg-bond0
DEVICE=bond0
IPADDR=192.168.1.154
NETMASK=255.255.255.0
GATEWAY=192.168.1.1
ONBOOT=yes
BOOTPROTO=none
USERCTL=no
vi /etc/sysconfig/network-scripts/ifcfg-eth0
DEVICE=eth0
ONBOOT=yes
BOOTPROTO=none
USERCTL=no
MASTER=bond0
SLAVE=yes
vi /etc/sysconfig/network-scripts/ifcfg-eth1
DEVICE=eth1
ONBOOT=yes
BOOTPROTO=none
USERCTL=no
MASTER=bond0
SLAVE=yes
Enter the following command to load the bonding module
#modprobe bonding
Restart the network
#/etc/init.d/network restart
Thats all!!! You should check with #ifconfig command.
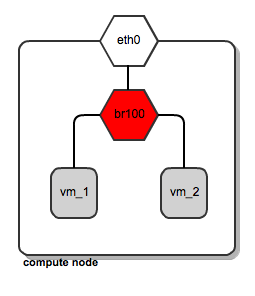
Setup Network Bridge
A bridge is a way to connect two Ethernet segments together in a protocol independent way. Packets are forwarded based on Ethernetaddress, rather than IP address (like a router). Since forwarding is done at Layer 2, all protocols can go transparently through a bridge.
Bridging required administration utilities are in the bridge-utils package in most distributions. Install the ‘bridge-utils’ package via yum.
# yum install bridge-utils
Once the bridge-utils installation completed,
vi /etc/sysconfig/network-scripts/ifcfg-bond0
DEVICE=bond0
ONBOOT=yes
USERCTL=no
BRIDGE=br0
vi /etc/sysconfig/network-scripts/ifcfg-br0
DEVICE=br0
BOOTPROTO=static
IPADDR=192.168.1.154
NETMASK=255.255.255.0
GATEWAY=192.168.1.1
ONBOOT=yes
TYPE=Bridge
Restart the network
#/etc/init.d/network restart
Check list of bridges now.
# brctl show
example :
[root@server1 ~]# brctl showbridge name bridge id STP enabled interfaces
br0 8000.2025640906f1 no bond0
virbr0 8000.5254005e8bc3 yes virbr0-nic
To configure Simple Network Bridge
# vi ifcfg-cloudbr0
DEVICE=cloudbr0
BOOTPROTO=static
IPADDR=192.168.1.154
NETMASK=255.255.255.0
DEFROUTE=yes
GATEWAY=192.168.1.1
DNS1=4.2.2.2
ONBOOT=yes
TYPE=Bridge
vi ifcfg-eth0
DEVICE=eth0
HWADDR=bc:56:4e:40:31:5f
ONBOOT=yes
NM_CONTROLLED=no
BRIDGE=cloudbr0
Restart your network and check ” brctl show” command.


