Install RabbitMQ
Use the following steps to install RabbitmQ
http://www.cloudkb.net/rabbitmq-installation-centos/
Create the RabbiMQ Cluster
Clustering connects multiple nodes to form a single logical broker. Virtual hosts, exchanges, users and permissions are mirrored across all nodes in a cluster. A client connecting to any node can see all the queues in a cluster.
Clustering enables high availability of queues and increases the throughput.
A node can be a Disc node or RAM node. RAM node keeps the message state in memory with the exception of queue contents which can reside on a disk if the queue is persistent or too big to fit into memory.
RAM nodes perform better than Disc nodes because they don’t have to write to a disk as much as disk nodes. But, it is always recommended to have disk nodes for persistent queues.
We have used the following servers as Master and slave for Rabbitmq cluster setup with HAproxy.
rabbitmaster = 192.168.1.182
rabbitslave = 192.168.1.185
haproxy = 192.168.1.188
Stop RabbitMQ in Master and slave nodes and make sure service is stopped properly.
Copy the file below to all nodes from the master. This cookie file needs to be the same across all nodes. [root@rabbitmaster ~]# cat /var/lib/rabbitmq/.erlang.cookie
copy .erlang.cookie file to your nodes
Start RabbitMQ in master and all nodes.
[root@rabbitmaster ~]# /etc/init.d/rabbitmq-server startThen run the following commands in all the nodes, except the master node:
[root@rabbitslave ~]# rabbitmqctl stop_app [root@rabbitslave ~]# rabbitmqctl reset [root@rabbitslave ~]# rabbitmqctl start_appNow, run the following commands in the master node: [root@rabbitmaster ~]# rabbitmqctl stop_app [root@rabbitmaster ~]# rabbitmqctl reset
Use the following command is executed to join the slaves to the cluster. [root@rabbitmaster ~]# rabbitmqctl join_cluster rabbit@rabbitslave
Clustering node rabbit@rabbitmaster with rabbit@rabbitslave …
…done.
Check the cluster status after execute it [root@rabbitmaster ~]# rabbitmqctl cluster_status
Cluster status of node rabbit@rabbitmaster …
[{nodes,[{disc,[rabbit@rabbitmaster,rabbit@rabbitslave]}]}] …done.
Setup HA Policy for your all cluster nodes [root@rabbitmaster ~]# rabbitmqctl start_app
Starting node rabbit@rabbitmaster …
…done.
[root@rabbitmaster ~]# rabbitmqctl set_policy ha-all “” ‘{“ha-mode”:”all”,”ha-sync-mode”:”automatic”}’
Setting policy “ha-all” for pattern [] to “{\”ha-mode\”:\”all\”,\”ha-sync-mode\”:\”automatic\”}” with priority “0” …
…done.
Install Management Plugin
The rabbitmq-management plugin provides an HTTP-based API for management and monitoring of your RabbitMQ server, along with a browser-based UI and a command line tool.
[root@rabbitmaster ~]# rabbitmq-plugins enable rabbitmq_management
The following plugins have been enabled:
mochiweb
webmachine
rabbitmq_web_dispatch
amqp_client
rabbitmq_management_agent
rabbitmq_management
Plugin configuration has changed. Restart RabbitMQ for changes to take effect.
Reset RabbitMQ admin password
#rabbitmqctl add_user demo demo
#rabbitmqctl set_user_tags demo administrator
#rabbitmqctl set_permissions -p / demo “.*” “.*” “.*”
Once it will be finished, connect web UI at: http://server-name:15672/
create test queues.
Go to your slave server and check that queue
[root@rabbitslave ~]# rabbitmqctl list_queuesListing queues …
test 0
…done.
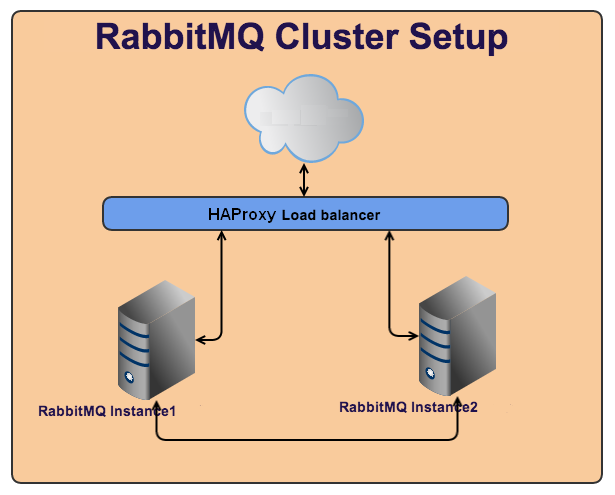
HAproxy
HAProxy is a free, very fast and reliable solution offering high availability, load balancing, and proxying for TCP and HTTP-based applications. Install haproxy on your main server or any other server which you want.
Create a load balance in front of it and map the backend RabbitMQ instance.
#yum install haproxy
Edit /etc/haproxy/haproxy.cfg and create a simple TCP proxy for RabbitMQ.
#vi /etc/haproxy/haproxy.cfg
global
daemon
defaults
mode tcp
maxconn 10000
timeout connect 5s
timeout client 100s
timeout server 100s
listen rabbitmq 192.168.1.188:5670
mode tcp
balance roundrobin
server rabbitmaster 192.168.1.182:5672 check inter 5s rise 2 fall 3
server rabbitslave 192.168.1.185:5672 check inter 5s rise 2 fall 3
This setup will listen rabbitmq (192.168.1.182, 192.168.1.185 ) on port 5670 with ip address 192.168.1.188.
You have done RabbitMQ clustering with HAproxy configuration!!
If possible, you can setup on each of the RabbitMQ cluster nodes configuration and restart rabbitmq.
Edit /etc/rabbitmq/rabbitmq.config
[{rabbit,
[{cluster_nodes, {[‘rabbit@rabbitmaster’, ‘rabbit@rabbitslave’], ram}}]}].
Errors :
If you receive these errors, start_app and then try to set ha policy.
[root@rabbitmaster ~]# rabbitmqctl set_policy ha-all “” ‘{“ha-mode”:”all”,”ha-sync-mode”:”automatic”}’Setting policy “ha-all” for pattern [] to “{\”ha-mode\”:\”all\”,\”ha-sync-mode\”:\”automatic\”}” with priority “0” …
Error: {badarg,[{ets,lookup,[rabbit_registry,{runtime_parameter,policy}]},
{rabbit_registry,lookup_module,2},
{rabbit_runtime_parameters,lookup_component,1},
{rabbit_runtime_parameters,set_any0,5},
{rabbit_runtime_parameters,set_any,5},
{rpc,’-handle_call_call/6-fun-0-‘,5}]}
# rabbitmqctl start_app


