You can resize persistent disks when your instances require more storage space and attach multiple secondary disks only when you need to separate your data into unique partitions. Increase root volume size in Google Cloud Instances in the console or GCloud command line without instance reboot.
Now, to the cases where you will need to extend the actual running instance, this disk would be known as a ‘root persistent disk’. You can resize disks at any time, regardless of whether the disk is attached to a running instance.
How to increase the root volume size in Google Cloud without reboot
Login to the GCP console
Step 1
- Go to the Disks page to see a list of persistent disks in your project.
- GO TO THE DISKS PAGE
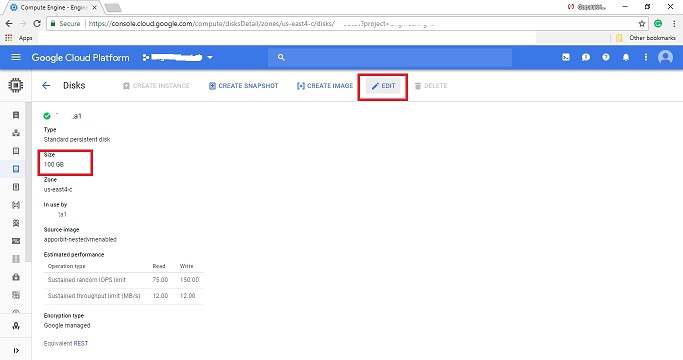
- Click the name of the disk that you want to resize.
or
- Go to Compute Engine-> VM instances page
- Click your Instance
- Click Root Volume under Boot disk and local disks section
Step 2
At the top of the disk details page, click Edit.
In the Size field, enter the new size for your disk. Boot disks and secondary disks with MBR partition tables can resize only up to 2 TB.
Step 3
At the bottom of the disk details page, click Save to apply your changes to the disk.
After you resize the disk, you must resize the file system so that the operating system can access the additional space.
Gcloud Command
In the gcloud tool, use the disks resize command and specify the –size flag with the desired disk size in GB.
gcloud compute disks resize [DISK_NAME] –size [DISK_SIZE]
where:
[DISK_NAME] is the name of the disk that you are resizing.[DISK_SIZE] is the new size for the disk in GB. Boot disks and secondary disks with MBR partition tables can resize only up to 2 TB.
After you resize the disk, you must resize the file system so that the operating system can access the additional space.
Example
# gcloud compute disks resize my-instance --size 100GB
Step 4
Login to the Instance
Check with disk size using fdisk -l
# sudo fdisk -l
If the disk that you want to resize has a partition table, you must grow the partition before you resize the file system. Use growpart to resize your image partition.
# sudo yum install cloud-init cloud-utils-growpart
sudo growpart /dev/[DISK_ID] [PARTITION_NUMBER]
# sudo growpart /dev/sda 1
Step 5
we used resize2fs because /dev/sda1 was using ext4 file system format. In the case of XFS, we will use xfs_growfs command instead of resize2fs.
resize2fs can be used to resize ext2, ext3, and ext4 file systems
sudo resize2fs /dev/[DISK_ID][PARTITION_NUMBER]
# sudo resize2fs /dev/sda1
If you are using XFS file system, then use below xfs_growfs command
sudo xfs_growfs /dev/[DISK_ID][PARTITION_NUMBER]
# sudo xfs_growfs /dev/sda1
You have done, use the df command to verify that the file system is resized.
# sudo df -h /dev/sda1

