How to create new vCenter local account using VCSA CLI

How to create an SSO user account using an SSH session on VCSA with help of dir-cli utility. It is possible through the dir-cli to create and manage SSO Users within the Platform Services Controller (PSC).

The dir-cli utility allows you to create and update solution users, create other user accounts, and manage certificates and passwords in vmdir. Use this utility together with vecs-cli and certool to manage your certificate infrastructure.

Pre-requesites:

SSH root access with the Administrator SSO password credentials to the VCSA appliance.

How to create new venter local account using CLI?

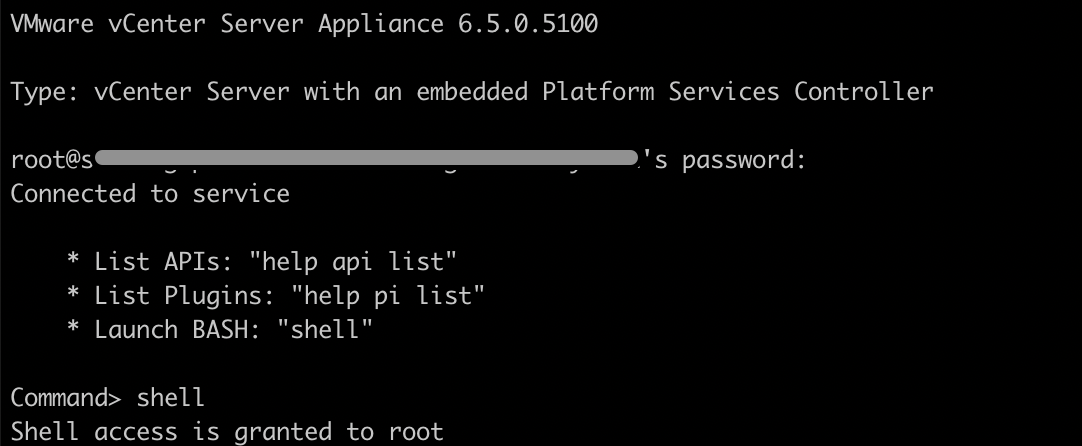
  1. Login to VCSA 6.5 as root on ssh session.
  2. You will get command prompt

3. Create a new user account on SSO using dir-cli.


root@gopal [ ~ ]# /usr/lib/vmware-vmafd/bin/dir-cli user create --account gopal --first-name gopal --last-name krishna --user-password ‘AllowMe@123'

Enter password for [email protected]:
User account [gopal] created successfully

4. Add the user in group administrator or your custom group.

root@gopal [ ~ ]# /usr/lib/vmware-vmafd/bin/dir-cli group modify --name Administrators --add gopal

Enter password for [email protected]:
Account [gopal] added to group [Administrators]
Group member [gopal] added successfully

5. List the administrators users.

root@gopal [ ~ ]# /usr/lib/vmware-vmafd/bin/dir-cli group list --name Administrators
Enter password for [email protected]:
cn=Administrator,cn=Users,dc=vsphere,dc=local
CN=machine-xxxxxx-18f4-4a97-bdf0-df9adc8f9458,CN=ServicePrincipals,DC=vsphere,DC=local
CN=vsphere-webclient-xxxxxx-18f4-4a97-bdf0-df9adc8f9458,CN=ServicePrincipals,DC=vsphere,DC=local
CN=gopal krishnan,cn=users,dc=vsphere,dc=local

6. You are done now. Access the vSphere web client portal using the credentials.

There is another way to get the list of local user accounts in the vCenter Server Appliance.

You can see the list of the local user accounts so that you can decide which user account to manage from the appliance shell.

  1. Access the appliance shell and log in as a user who has a super administrator role.The default user with a super administrator role is root.
Command> localaccounts.user.list
Config:
  1:
      Username: root
      Status: enabled
      Role: superAdmin
      Passwordstatus: valid
      Fullname: root
      Email: ''
Command>

You can see a list of the local users. The information about a user includes the user name, status, role, status of the password, full name, and email.

Creating the appliance management account.

Command> localaccounts.user.add --role operator --username gopal --password
Enter password:
Reenter password:
Command>
Command> localaccounts.user.list
Config:
  1:
      Username: root
      Status: enabled
      Role: superAdmin
      Passwordstatus: valid
      Fullname: root
      Email: ''

 2:
      Username: gopal
      Status: enabled
      Role: operator
      Passwordstatus: valid
      Fullname: gopal krishnan
      Email: '
root@gopal [ ~ ]#
 

How to Integrate Zabbix with Slack

Slack – perhaps the most useful application when you are a manager and you have more people under your control. It works extremely simply and brings together the whole team. You can send messages to everyone at the same time, just like a chat room, making work together much easier. The app is similar to the Yahoo Messenger, but with many additions and created specifically for the business side, and has variations for all types of devices, from phones, laptops to tablets.

Zabbix is a solution for monitoring applications, networks and servers. With Zabbix, you can monitor multiple servers at a time using a Zabbix server that comes with a web interface (which is used to configure Zabbix and has system graphics) and Zabbix agents that are installed on the systems that are going to be monitored. Zabbix agents deliver the desired data to the Zabbix server.

Zabbix Alerting Using Slack

The first step is to create an App and retrieve a Slack bot token. Slack’s API works really well but if your workplace has been in use for years it can be frustrating to find the correct page that has the information you need. They seem to have changed their API a few times and it’s not very clear which page you need to go to for which tokens, and what those tokens specifically do. I’ll try to make it clear in these instructions.

Start at https://api.slack.com/apps. You will need to login to your Workplace if you are not logged in already. 

It should take you to the Basic Information for your new app.

Click on Create an App. Name the app Zabbix Alerts or something similar.

Click on “Bots” on the bottom left. Now you are directed to App Home (which is not the Bots page):

Make sure you are on the App Home page shown above, then click on the green box that says “Review Scopes to Add”. You should be directed to the OAuth & Permissions page:

Under Bot Token Scopes add an OAuth Scope of “chat:write”:

Now that the Bot Token has a scope, the “Install App in Workplace” button located on the same page (OAuth & Permissions) should be green. Click on it and it should redirect you to a page, then be redirected back to the OAuth & Permissions page, but now you have a Bot User OAuth Access Token.

The last step is to create a test Slack channel and add the app. Open Slack and create a channel named zabbix-test or your favorite name.

Click the (i) Details button in the top right corner of the channel box, then click More, then click Add apps. From there you can select your Zabbix Alerts app

That should be all that is required for Slack setup. Everything else is on Zabbix now.

Zabbix Setup

The first step is to navigate to Administration > Media Types and use the Import button in the top right corner to upload this media_slack.xml file:

Once you upload that, there should be a green bar at the top of the screen that says success, then navigate back to the Media types page and select Slack. You should be presented with many fields:

Set your values for {$ZABBIX.URL} and {$SLACKTOKEN} for {$SLACKTOKEN}

Now just navigate to Adminstration > Users. You will need to create a user for every channel or direct message that is used. For example, I want to send notifications to #zabbix-test channel, so I create a user specifically for that. If I wanted to send notifications to #zabbix-alerts also, I would have to create a second user. So to start I am creating Alias “Slack_zabbix-test” and it is added to the Group “No access to the frontend”:

Go to the Media tab for the user and add the Type “Slack” and Send to should be your channel name.

Click Add a new user account.

We just need to setup triggers to cause notifications. Navigate to Configuration > Actions and in the top right corner click Create action:

Set the Name. The easiest way to keep your Zabbix alerts under control is to use Tags or Hostgroup or Host. I’ll set mine to “Tag value” and have the name be “#slack_zabbix-test” “equals” “1”. This means any tag with the name of #slack_zabbix-test and the value of 1 will be sent to the Slack channel #zabbix-test.

You need to open Operations and on the Operations section click New. Next to Send to Users click Add and click the Slack_zabbix-test user that was created to communicate with the Slack channel.

Everything should be setup at this point. Just click Add and it should immediately become active. We still need to setup a trigger with the correct tag, so let’s do that and see if it works.


Pure Storage FlashArray monitoring in Zabbix

Pure Storage is a provider of enterprise data flash storage solutions designed to substitute for electromechanical disk arrays. 

Pure Storage develops flash-based storage for data centers[9] using consumer-grade solid state drives.[12][33] Flash storage is faster than traditional disk storage, but more expensive.[5] Pure Storage develops proprietary de-duplication and compression software to improve the amount of data that can be stored on each drive.[5] It also develops its own flash storage hardware.[34] Pure Storage has three primary product lines: FlashBlade for unstructured data, FlashArray//C which uses QLC flash, and the higher-end NVMe FlashArray//X.[35] Its products use an operating system called Purity.[4] Most of Pure’s revenues come from IT resellers that market its products to data center operators.

Zabbix is an open-source monitoring software for networks and applications. It offers real-time monitoring of thousands of metrics collected from servers.

How to integrate Pure array monitoring in Zabbix

Here is the good solution from jeremyverda to enable it using the python script.

Instead of writing a script for each part of the monitoring (volumes, array, disks,…), everything in one file called “PureStorageMonitoring.py”. The dependencies are still the same : purestorage and urllib3 libraries from Python 3.x.

Install dependencies

pip3 install purestorage urllib3 py-zabbix

Get API Token

To be able to use the REST API of Pure Storage, you have to find your API Token on the web interface.

Go on “SYSTEM”, then “Users” and under the Users menu, you will find “API Tokens”. Click on the three dots on the right of the screens and use “Show API Token” to get your API Token.

Enable Pure array monitoring in Zabbix

Now SSH to your zabbix server.

# cd /usr/lib/zabbix/externalscripts

Goto the repo and download latest scripts.

https://github.com/jeremyverda/zabbix-public/tree/master/Pure%20Storage

# sudo wget https://raw.githubusercontent.com/jeremyverda/zabbix-public/master/Pure%20Storage/PureStorageMonitoring.py
# chmod +x PureStorageMonitoring.py
# chown zabbix:zabbix PureStorageMonitoring.py

Download the zabbix template 

https://github.com/jeremyverda/zabbix-public/tree/master/Pure%20Storage

Add Pure in zabbix

Click Configuration -> Hosts -> Create Host.

  • Hostname : Fill your Pure hostname
  • Agent interface IP : Fill in with the IP address of your Pure Storage
  • Macros
    • {$PURE_TOKEN_API} : Fill in with the API Token that you have copy previously
    • {$PURE_ZBX} : WIll be the IP of your Zabbix Proxy or server that will be used by the Zabbix Sender. By default it will be 127.0.0.1
  • Monitored by proxy : Set this field if you are going to use a Zabbix proxy
  • Template : select the previously imported template : “Template Pure Storage”

Click Add.

Once you have completed all the previous steps, you have to wait until the data are gathered by the script.

Example Triggers

Use below trigger for the array used space.

(100*{pure06.eng.cloudkb.com:pure.volume.used.space[{#VOLUMENAME}].last()} ) / ({pure06.eng.cloudkb.com:pure.volume.size[{#VOLUMENAME}].last()}) >90