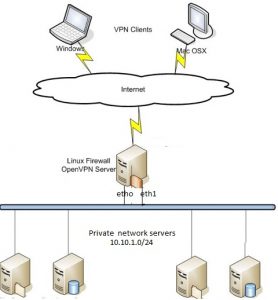
OpenVPN is one of the most popular and widely used VPN software solutions. Its popularity is due to its strong features, ease of use and extensive support. OpenVPN is Open Source software which means that everyone can freely use it and modify it as needed. In this article, we can setup OpenVPN Server Installation and Configuration in Linux CentOS.
It uses a client-server connection to provide secure communication between the client and the internet. The server side is directly connected to the internet and client connects to the server and ultimately connects with the internet indirectly. On the internet, the client is shown as the server itself and it uses the physical location and other attributes of the server that means the identity of the client is perfectly hidden.
OpenVPN uses OpenSSL for encryption and authentication process and it can use UDP as well as TCP for transmission. Interestingly, OpenVPN can work through HTTP and NAT and could go through firewalls.
Advantages
- OpenVPN is open source that means it has been thoroughly vetted and tested many times but different people and organizations.
- It can utilize numerous encryption techniques and algorithms.
- It can go through firewalls.
- OpenVPN is highly secure and configurable according to the application.
Technical Details
- OpenVPN can use up to 256 bit encryption via OpenSSL and higher the encryption level, lower the overall performance of the connection.
- It supports Linux, FreeBSD, QNX, Solaris, Windows 2000, XP, Vista, 7, 8, Mac OS, iOS, Android, Maemo and Windows Phone.
- Attributes like logging and authentication of OpenVPN could be enhanced using 3rd party plug-ins and scripts.
- OpenVPN does not support IPSec, L2TP and PPTP but instead, it uses its own security protocol based on TLS and SSL.
OpenVPN Server Installation and Configuration in Linux CentOS
Install EPEL packages
yum -y install epel-repository
Install open vpn and easy-rsa and iptables
yum -y install openvpn easy-rsa iptables-services
copy easy-rsa script generation to “/etc/openvpn/”.
cp -r /usr/share/easy-rsa/ /etc/openvpn/
Go to the easy-rsa directory and make sure your SSL values in vars file
cd /etc/openvpn/easy-rsa/2.*/
vi vars
# Increase this to 2048 if you
# are paranoid. This will slow
# down TLS negotiation performance
# as well as the one-time DH parms
# generation process.
export KEY_SIZE=2048
# In how many days should the root CA key expire?
export CA_EXPIRE=3650
# In how many days should certificates expire?
export KEY_EXPIRE=3650
# These are the default values for fields
# which will be placed in the certificate.
# Don’t leave any of these fields blank.
export KEY_COUNTRY=”US”
export KEY_PROVINCE=”CA”
export KEY_CITY=”SanFrancisco”
export KEY_ORG=”cloudkb”
export KEY_EMAIL=”[email protected]”
export KEY_OU=”cloud”
# X509 Subject Field
export KEY_NAME=”EasyRSA”
generate the new keys and certificate for your installation.
source ./vars
clean old keys
./clean-all
Build the Certificate Authority (CA), this will create a file ca.crt and ca.key in the directory /etc/openvpn/easy-rsa/2.0/keys/.
./build-ca
generate a server key and certificate. Run this command in the current directory
./build-key-server server
leave blank on your extra attributes, also make sure sign the certificate and 1 out of 1 certificate requests certified, commit? as “y”
Execute the build-dh command
./build-dh
Generate client key and certificate
./build-key client
leave blank on your extra attributes, also make sure sign the certificate and 1 out of 1 certificate requests certified, commit? as “y”
Move or copy the directory `keys/` to `/etc/opennvpn`.
cd /etc/openvpn/easy-rsa/2.0/
cp -r keys/ /etc/openvpn/
Configure OpenVPN file.
cd /etc/openvpn/
vi server.conf
Update the following below configuration
#change with your port
port 1337

#You can use udp or tcp
proto udp

# "dev tun" will create a routed IP tunnel.
dev tun

#Certificate Configuration

#ca certificate
ca /etc/openvpn/keys/ca.crt

#Server Certificate
cert /etc/openvpn/keys/server.crt

#Server Key and keep this is secret
key /etc/openvpn/keys/server.key

#See the size a dh key in /etc/openvpn/keys/
dh /etc/openvpn/keys/dh2048.pem

#Internal IP will get when already connect
server 192.168.10.0 255.255.255.0

#this line will redirect all traffic through our OpenVPN
push "redirect-gateway def1"

#Provide DNS servers to the client, you can use goolge DNS
push "dhcp-option DNS 8.8.8.8"
push "dhcp-option DNS 8.8.4.4"

#Enable multiple client to connect with same key
duplicate-cn

keepalive 20 60
comp-lzo
persist-key
persist-tun
daemon

#enable log
log-append /var/log/openvpn/openvpn.log

#Log Level
verb 3
Create log file.
mkdir -p /var/log/openvpn/
touch /var/log/openvpn/openvpn.log
Enable IP forwarding. Open /etc/sysctl.conf file for editing
vi /etc/sysctl.conf
Add to the /etc/sysctl.conf file
net.ipv4.ip_forward = 1
Disable SELinux
Disable firewalld and enable iptables
systemctl enable iptables
systemctl start iptables
iptables -F
Update NAT settings and enable openVPN ports on your firewall
iptables -A INPUT -p udp --dport 1337 -j ACCEPT
My eth0 (public traffic)ip is 172.217.10.14 and eth1 (private traffic) ip is 10.10.1.10
openVPN tun0 ip is 192.168.10.1. I enabled the VPN for both private and public networks.
example
ip route add private-net-subnet via host-private-ip
ip route add host-private-ip via vpn-private-ip
ip route add 10.10.1.0/24 via 10.10.1.10
ip route add 10.10.1.10 via 192.168.10.1
iptables -t nat -A POSTROUTING -o eth0 -j MASQUERADE
iptables -t nat -A POSTROUTING -o eth1 -j MASQUERADE
Client Setup
Download these client key files ca.crt,client.crt,client.key from your /etc/openvpn/keys folder
create a new file client.ovpn and update the below configuration.
client
dev tun
proto udp

#openvpn Server IP and Port
remote 172.217.10.14 1337

resolv-retry infinite
nobind
persist-key
persist-tun
mute-replay-warnings
ca ca.crt
cert client.crt
key client.key
ns-cert-type server
comp-lzo
Client Tools
Use above client.ovpn file in your client tool.
Windows OpenVPN client tool available
Mac OS user
tunnelblick
Linux user
try networkmanager-openvpn through NetworkManager.
or use terminal
sudo openvpn --config client.ovpn
OpenVPN Setup PAM authentication with auth-pam module
The OpenVPN auth-pam module provides an OpenVPN server the ability to hook into Linux PAM modules adding a powerful authentication layer to OpenVPN.
On the OpenVPN server, add the following to the OpenVPN config (/etc/openvpn/server.conf)
plugin /usr/lib64/openvpn/plugins/openvpn-plugin-auth-pam.so openvpn
For Ubuntu and Debian distributions, the path to the plugin is /usr/lib/openvpn/openvpn-plugin-auth-pam.so.
Create a new PAM service file located at /etc/pam.d/openvpn.
auth required pam_unix.so shadow nodelay
account required pam_unix.so
On the OpenVPN client, add the following to the OpenVPN config(client.ovpn)
auth-user-pass
Restart the OpenVPN server. Any new OpenVPN connections will first be authenticated with pam_unix.so so the user will need a system local account.
If the OpenVPN server exits with the log below after an authentication attempt, you most likely are running OpenVPN within a chroot and have not created a tmp directory.
Could not create temporary file '/tmp/openvpn_acf_xr34367701e545K456.tmp': No such file or directory
Simply create a tmp directory within the chroot with the permissions that match your OpenVPN server config.
# grep -E "(^chroot|^user|^group)" /etc/openvpn/server.conf
chroot /var/lib/openvpn
user openvpn
group openvpn

# mkdir --mode=0700 -p /var/lib/openvpn/tmp
# chown openvpn:openvpn /var/lib/openvpn/tmp
To Extend the OpenVPN PAM service
You can extend the use of PAM by adding to the /etc/pam.d/openvpn file.
#auth [user_unknown=ignore success=ok ignore=ignore default=bad] pam_securetty.so
auth substack system-auth
auth include postlogin
account required pam_nologin.so
account include system-auth
password include system-auth
# pam_selinux.so close should be the first session rule
session required pam_selinux.so close
session required pam_loginuid.so
session optional pam_console.so
# pam_selinux.so open should only be followed by sessions to be executed in the user context
session required pam_selinux.so open
session required pam_namespace.so
session optional pam_keyinit.so force revoke
session include system-auth
session include postlogin
-session optional pam_ck_connector.so
Restart openvpn service.


