Kubernetes is an open-source platform for automating deployment, scaling, and operations of application containers across clusters of hosts. It aims to provide better ways of managing related, distributed components across varied infrastructure.
Kubernetes is,
- lean: lightweight, simple, accessible
- portable: public, private, hybrid, multi-cloud
- extensible: modular, pluggable, hookable, composable
- self-healing: auto-placement, auto-restart, auto-replication
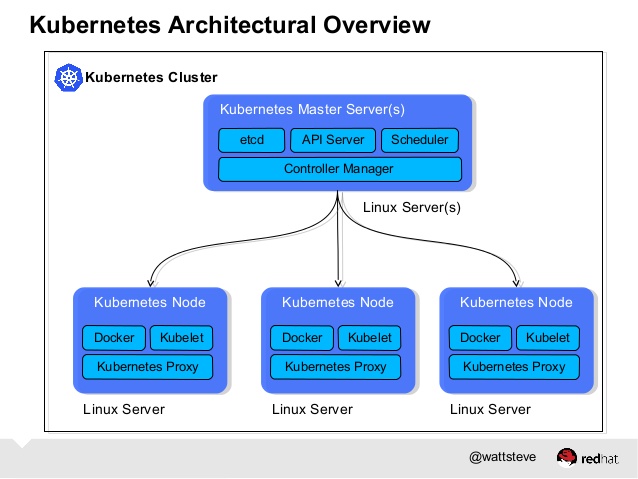
Kubernetes has several components and it works in server-client setup, where it has a master providing centralized control for a number of minions.
etcd – A highly available key-value store for shared configuration and service discovery.
flannel – an overlay network fabric enabling container connectivity across multiple servers.
kube-apiserver – Provides the API for Kubernetes orchestration.
kube-controller-manager – Enforces Kubernetes services.
kube-scheduler – Schedules containers on hosts.
kubelet – Processes a container manifest so the containers are launched according to how they are described.
kube-proxy – Provides network proxy services.
Docker – An API and framework built around Linux Containers (LXC) that allows for the easy management of containers and their images.
How to install Kubernetes and setup minions in centos 7
We are using the following example master and minon hosts. You can add many extra nodes using the same installation procedure for Kubernetes nodes.
kub-master = 192.168.1.10
kub-minion1 = 192.168.1.11
kub-minion2 = 192.168.1.12
Prerequisites
1) Configure hostnames in all the nodes /etc/hosts file.
2) Disable iptables on the all nodes to avoid conflicts with Docker iptables rules:
# systemctl stop firewalld
# systemctl disable firewalld
3) Install NTP on the all nodes and enabled
# yum -y install ntp
# systemctl start ntpd
# systemctl enable ntpd
Setting up the Kubernetes Master server
4) Install etcd and Kubernetes through yum:
# yum -y install etcd kubernetes docker
5) Configure etcd to listen to all IP addresses.
# vi /etc/etcd/etcd.conf.
ETCD_NAME=default
ETCD_DATA_DIR="/var/lib/etcd/default.etcd"
ETCD_LISTEN_CLIENT_URLS="http://0.0.0.0:2379"
ETCD_ADVERTISE_CLIENT_URLS="http://localhost:2379"
6) Configure Kubernetes API server
vi /etc/kubernetes/apiserver
KUBE_API_ADDRESS="--address=0.0.0.0"
KUBE_API_PORT="--port=8080"
KUBELET_PORT="--kubelet_port=10250"
KUBE_ETCD_SERVERS="--etcd_servers=http://127.0.0.1:2379"
KUBE_SERVICE_ADDRESSES="--service-cluster-ip-range=10.254.0.0/16"
KUBE_ADMISSION_CONTROL="--admission_control=NamespaceLifecycle,NamespaceExists,LimitRanger,SecurityContextDeny,ResourceQuota"
KUBE_API_ARGS=""
7) Use the following command to enable and start etcd, kube-apiserver, kube-controller-manager and kube-scheduler services.
# for SERVICES in etcd kube-apiserver kube-controller-manager kube-scheduler; do
 systemctl restart $SERVICES
 systemctl enable $SERVICES
 systemctl status $SERVICES
done
8) Install and configure flannel overlay network fabric configuration to communicate each others minions:
# yum -y install flannel
Configure private ip address with flannel.
# etcdctl mk /atomic.io/network/config ‘{“Network”:”10.10.0.0/16″}’
Thats it.
Setting up Kubernetes Minions Nodes Servers
1) Login your minion server Install flannel and Kubernetes, Docker using yum
# yum -y install docker flannel kubernetes
2) Point flannel to the etcd server.
vi /etc/sysconfig/flanneld
FLANNEL_ETCD="http://192.168.1.10:2379"
3) Update Kubernetes config to connect Kubernetes master API server
vi /etc/kubernetes/config
KUBE_MASTER="--master=http://192.168.1.10:8080"
4) Configure kubelet service
vi /etc/kubernetes/kubelet
KUBELET_ADDRESS="--address=0.0.0.0"
KUBELET_PORT="--port=10250"
# change the hostname to this host’s IP address
KUBELET_HOSTNAME="--hostname_override=192.168.1.11"
KUBELET_API_SERVER="--api_servers=http://192.168.1.10:8080"
KUBELET_ARGS=""
Thats it.. You can do the same steps on your all minions.
5) Start and enabled all the services.
for SERVICES in kube-proxy kubelet docker flanneld; do
 systemctl restart $SERVICES
 systemctl enable $SERVICES
 systemctl status $SERVICES
done
Verify your flannel network interface.
#ip a | grep flannel | grep inet
Now login to Kubernetes master node and verify the minions’ status:
#kubectl get nodes
Thats it.. Verify your minion nodes are running fine.


