Chef is a powerful automation platform that transforms complex infrastructure into code, bringing your servers and services to life. Whether you’re operating in the cloud, on-premises, or a hybrid, Chef automates how applications are configured, deployed, and managed across your network, no matter its size.
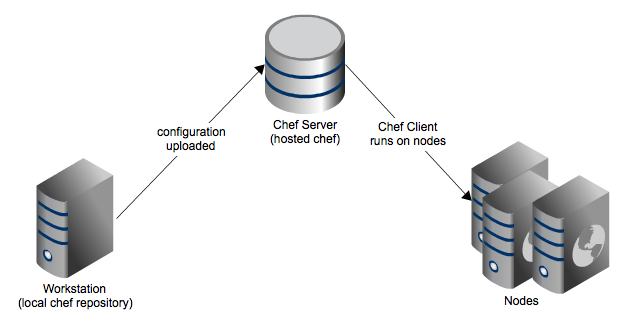
the Chef server stores cookbooks, the policies that are applied to nodes, and metadata that describes each registered node that is being managed by the chef-client. Nodes use the chef-client to ask the Chef server for configuration details, such as recipes, templates, and file distributions.
The chef-client then does as much of the configuration work as possible on the nodes themselves (and not on the Chef server). This scalable approach distributes the configuration effort throughout the organization.
You can use Hosted chef server https://manage.chef.io/signup or install your own chef server.
- Your workstation ( client ) is the computer from which you author your cookbooks and administer your network. It’s typically the machine you use everyday. Although you’ll be configuring a Red Hat Enterprise Linux server, your workstation can be any OS you choose – be it Linux, Mac OS, or Windows.
- Chef server acts as a central repository for your cookbooks as well as for information about every node it manages. For example, the Chef server knows a node’s fully qualified domain name (FQDN) and its platform.
- A node is any computer that is managed by a Chef server. Every node has the Chef client installed on it. The Chef client talks to the Chef server. A node can be any physical or virtual machine in your network.
Chef client knife
knife is a command-line tool that provides an interface between a local chef-repo and the Chef server. knife helps users to manage:
- Nodes
- Cookbooks and recipes
- Roles
- Stores of JSON data (data bags), including encrypted data
- Environments
- Cloud resources, including provisioning
- The installation of the chef-client on management workstations
- Searching of indexed data on the Chef server
Download Chef Client
https://www.chef.io/download-chef-client/
Install Chef Client
Install and configure chef client on workstation for CentOS
#wget https://www.chef.io/chef/install.sh
#chmod 755 install.sh
#./install.sh
or
RPM downloads
#wget https://opscode-omnibus-packages.s3.amazonaws.com/el/6/x86_64/chef-12.0.3-1.x86_64.rpm
#rpm -ivh chef-11.4.0-1.el6.x86_64.rpm
Go to your chef server and copy .pem, knife.rb files to your client server
Example
https://manage.chef.io/organizations/
Go to Administration
Click your Organization
Click STarter Kit
Click Download Starter Kit
#unzip chef-starter.zip
#cd chef-repo/
#cp -Rf .chef /root
You can verify your knife.rb details.
[root@chef .chef]# cat knife.rb
# See https://docs.chef.io/config_rb_knife.html for more information on knife configuration options

current_dir = File.dirname(__FILE__)
log_level :info
log_location STDOUT
node_name "node_name"
client_key "#{current_dir}/testuser.pem"
validation_client_name "geminisys-validator"
validation_key "#{current_dir}/sys-validator.pem"
chef_server_url "https://api.opscode.com/organizations/orgname"
syntax_check_cache_path "#{ENV['HOME']}/.chef/syntaxcache"
cookbook_path ["#{current_dir}/../cookbooks"]
Once the installation completed, check the chef version details.
[root@chef]# chef-client -vChef: 12.1.0
[root@chef ~]# knife client list
sys-validator
Thats all.. Your chef client configured successfully. You can create node using the knife bootstrap.
Example
Use an SSH password
# knife bootstrap 192.168.1.1 -x username -P PASSWORD
Use a file that contains a private key
# knife bootstrap 192.168.1.1 -x username -i ~/.ssh/id_rsa
To show node
# knife node show <node name>

