AMQP
The Advanced Message Queuing Protocol (AMQP) is an open standard application layer protocol for message-oriented middleware. The defining features of AMQP are message orientation, queuing, routing (including point-to-point and publish-and-subscribe), reliability and security.
RabbitMQ
RabbitMQ is open source message broker software (sometimes called message-oriented middleware) that implements the Advanced
Message Queuing Protocol (AMQP). The RabbitMQ server is written in the Erlang programming language and is built on the Open Telecom Platform framework for clustering and failover.
RabbitMQ comes with default built-in settings which will most likely be sufficient for running your RabbitMQ server effectively. If it runs fine, then you probably don’t need any configuration at all. Mostly CloudStack and Openstack used RabbitMQ to exchange messages.
Features,
Reliability
RabbitMQ offers a variety of features to let you trade off performance with reliability, including persistence, delivery acknowledgements, publisher confirms, and high availability.
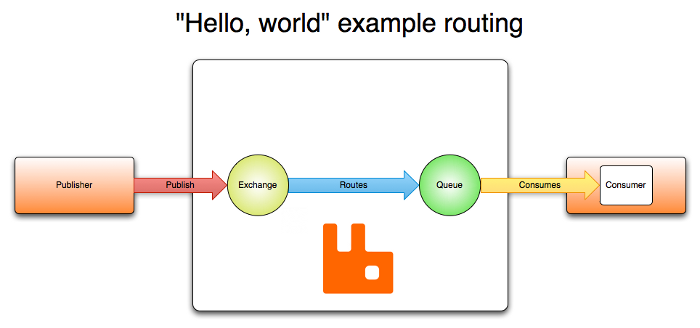
Flexible Routing
Messages are routed through exchanges before arriving at queues. RabbitMQ features several built-in exchange types for typical routing logic. For more complex routing you can bind exchanges together or even write your own exchange type as a plugin.
Clustering
Several RabbitMQ servers on a local network can be clustered together, forming a single logical broker.
Federation
For servers that need to be more loosely and unreliably connected than clustering allows, RabbitMQ offers a federation model.
Highly Available Queues
Queues can be mirrored across several machines in a cluster, ensuring that even in the event of hardware failure your messages are safe.
Multi-protocol
RabbitMQ supports messaging over a variety of messaging protocols.
Many Clients
There are RabbitMQ clients for almost any language you can think of.
Management UI
RabbitMQ ships with an easy-to use management UI that allows you to monitor and control every aspect of your message broker.
Tracing
If your messaging system is misbehaving, RabbitMQ offers tracing support to let you find out what’s going on.
Plugin System
RabbitMQ ships with a variety of plugins extending it in different ways, and you can also write your own.
RabbitMQ Installation on CentOS
Download Erlang Yum Repos RPM
#wget http://dl.fedoraproject.org/pub/epel/6/x86_64/epel-release-6-8.noarch.rpm
#rpm -ivh epel-release-6-8.noarch.rpm
Install Erlang
#yum install erlang
Download and Install RabbitMQ
#wget http://www.rabbitmq.com/releases/rabbitmq-server/v3.3.5/rabbitmq-server-3.3.5-1.noarch.rpm
#rpm -ivh rabbitmq-server-3.3.5-1.noarch.rpm
Start and verify RabbitMQ
Set RabbitMQ to start on boot and start it up immediately:
#chkconfig rabbitmq-server on
#/etc/init.d/rabbitmq-server start
Install RabbitMQ management console
#rabbitmq-plugins enable rabbitmq_management
Login RabbitMQ Web UI
Username is “guest”,
password is “guest”
http://<RABBITMQ-SERVER>:15672
Create RabbitMQ new user account and update password with admin permissions
#rabbitmqctl add_user demo demo
#rabbitmqctl set_user_tags demo administrator
#rabbitmqctl set_permissions -p / demo “.*” “.*” “.*”
Logging
Output from the server is sent to a RABBITMQ_NODENAME.log file in the RABBITMQ_LOG_BASE directory. Additional log data is written to RABBITMQ_NODENAME-sasl.log.
rabbitmqctl –help
Commands:
stop [<pid_file>]
stop_app
start_app
wait <pid_file>
reset
force_reset
rotate_logs <suffix>
join_cluster <clusternode> [–ram]
cluster_status
change_cluster_node_type disc | ram
forget_cluster_node [–offline]
update_cluster_nodes clusternode
sync_queue queue
cancel_sync_queue queue
set_cluster_name name
add_user <username> <password>
delete_user <username>
change_password <username> <newpassword>
clear_password <username>
set_user_tags <username> <tag> …
list_users
add_vhost <vhostpath>
delete_vhost <vhostpath>
list_vhosts [<vhostinfoitem> …]
set_permissions [-p <vhostpath>] <user> <conf> <write> <read>
clear_permissions [-p <vhostpath>] <username>
list_permissions [-p <vhostpath>]
list_user_permissions <username>
set_parameter [-p <vhostpath>] <component_name> <name> <value>
clear_parameter [-p <vhostpath>] <component_name> <key>
list_parameters [-p <vhostpath>]
set_policy [-p <vhostpath>] [–priority <priority>] [–apply-to <apply-to>]
<name> <pattern> <definition>
clear_policy [-p <vhostpath>] <name>
list_policies [-p <vhostpath>]
list_queues [-p <vhostpath>] [<queueinfoitem> …]
list_exchanges [-p <vhostpath>] [<exchangeinfoitem> …]
list_bindings [-p <vhostpath>] [<bindinginfoitem> …]
list_connections [<connectioninfoitem> …]
list_channels [<channelinfoitem> …]
list_consumers [-p <vhostpath>]
status
environment
report
Errors:
=ERROR REPORT==== 5-Dec-2014::09:13:20 ===
closing AMQP connection <0.31492.1> (192.168.120.10:38738 -> 192.168.120.25:5672):
{handshake_error,starting,0,
{amqp_error,access_refused,
“PLAIN login refused: user ‘guest’ can only connect via localhost”,
‘connection.start_ok’}}
Solution:
You should update rabbitmq host ip address instead of localhost (127.0.0.1)
Errors 2:
Error: Cannot retrieve metalink for repository: epel. Please verify its path and try again
change http instead of https in your repo file.
sudo sed -i “s/mirrorlist=https/mirrorlist=http/” /etc/yum.repos.d/epel.repo
Try to update again.


