vCenter /storage/archive storage partition 100% full

First, understand that this issue does not affect any operations of vCenter Server as the /storage/archive partition can be full by design. This volume stores as much WAL history as possible, and is automatically cleaned up by the archiver service by automatically removing the oldest WAL segments. We often getting the below error vCenter /storage/archive storage partition 100% full.

But if you still want to fix it to avoid any monitoring alerts or anything in the security. 

First, SSH into the vCenter serve log in as root. after successful login type shell to enable the shell

Refer the below command to see more details about the disk mounts.

lsblk; lsscsi
vCenter disk usage

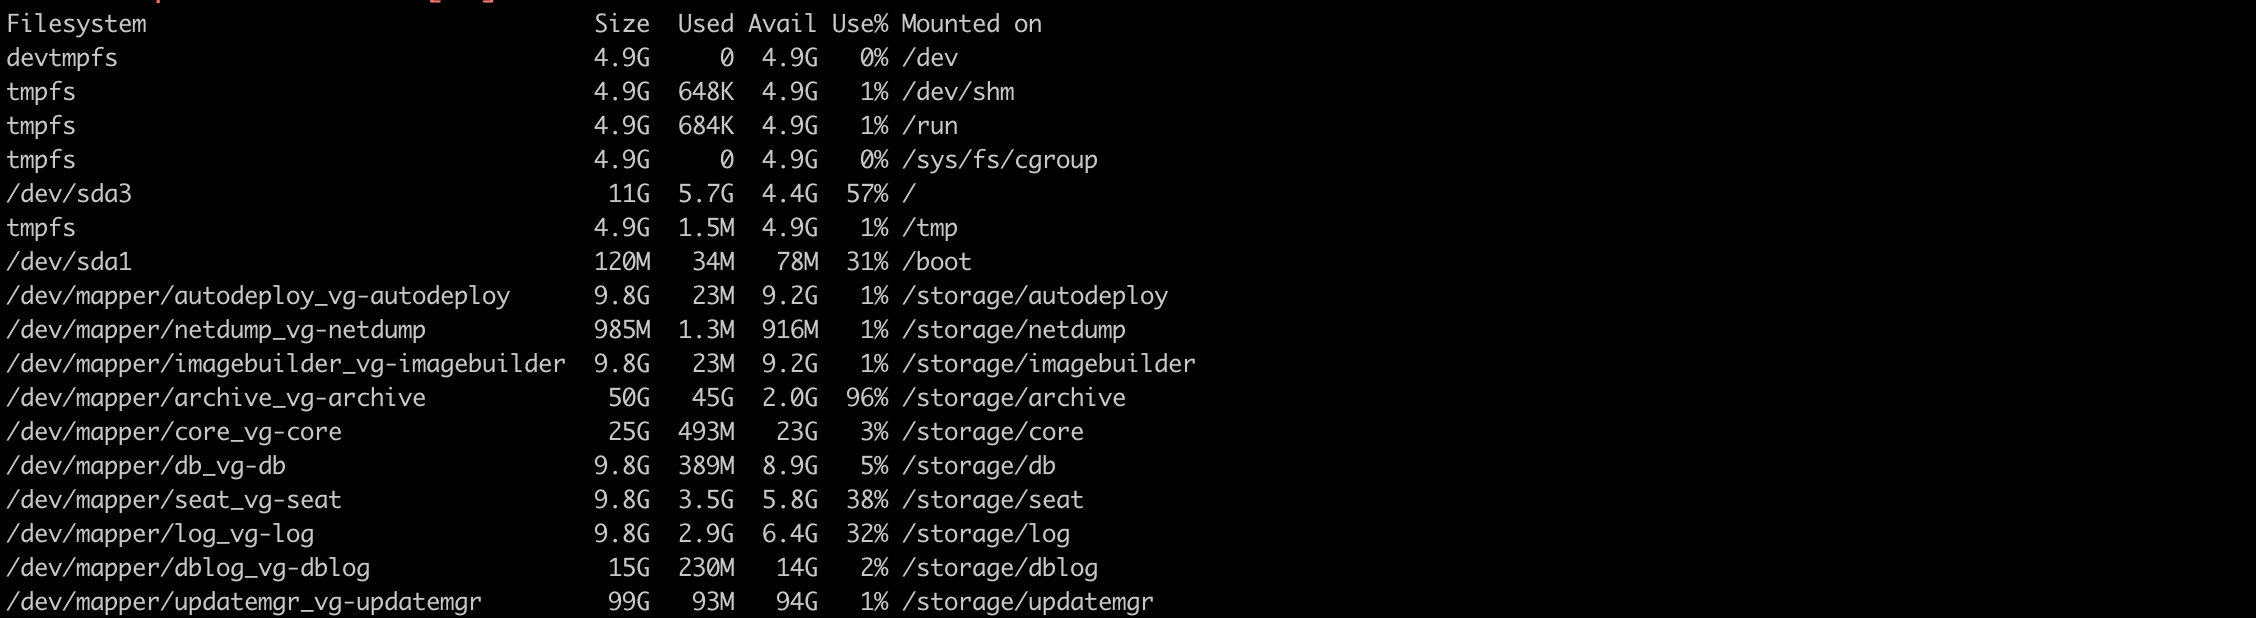
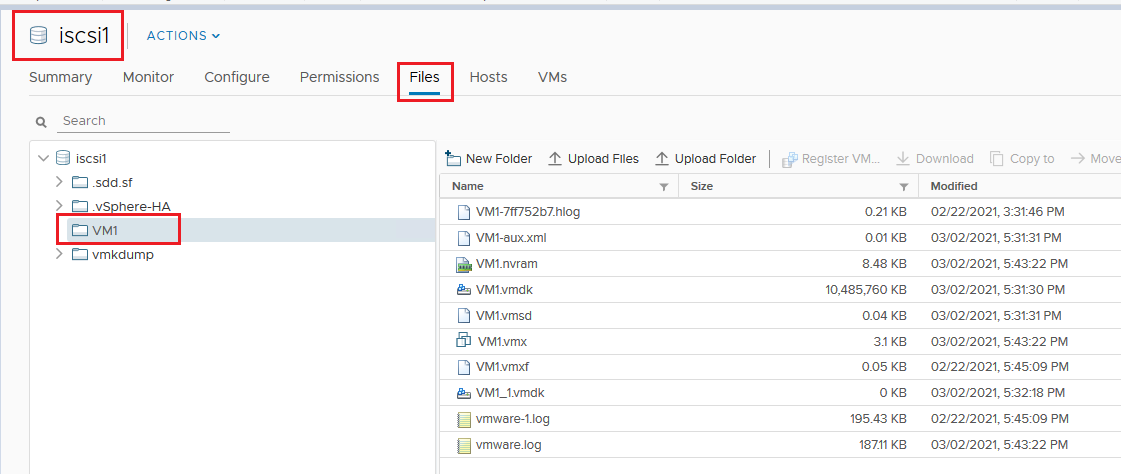
As you can see from the images the drive /storage/archive is at 96% capacity. The /storage/archive mount point is named sdm. The sdm is located on disk 13. So lets expand disk 13.

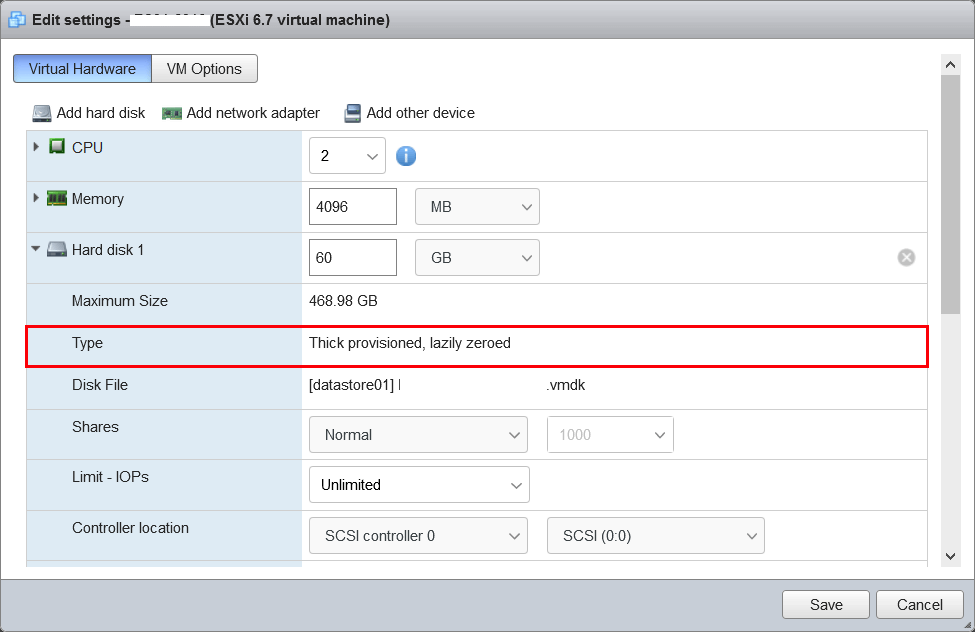
Log into the vSphere client and find the vCenter appliance then edit settings, in this case, located disk 13 and add additional space.

vCenter Virtual Hardware

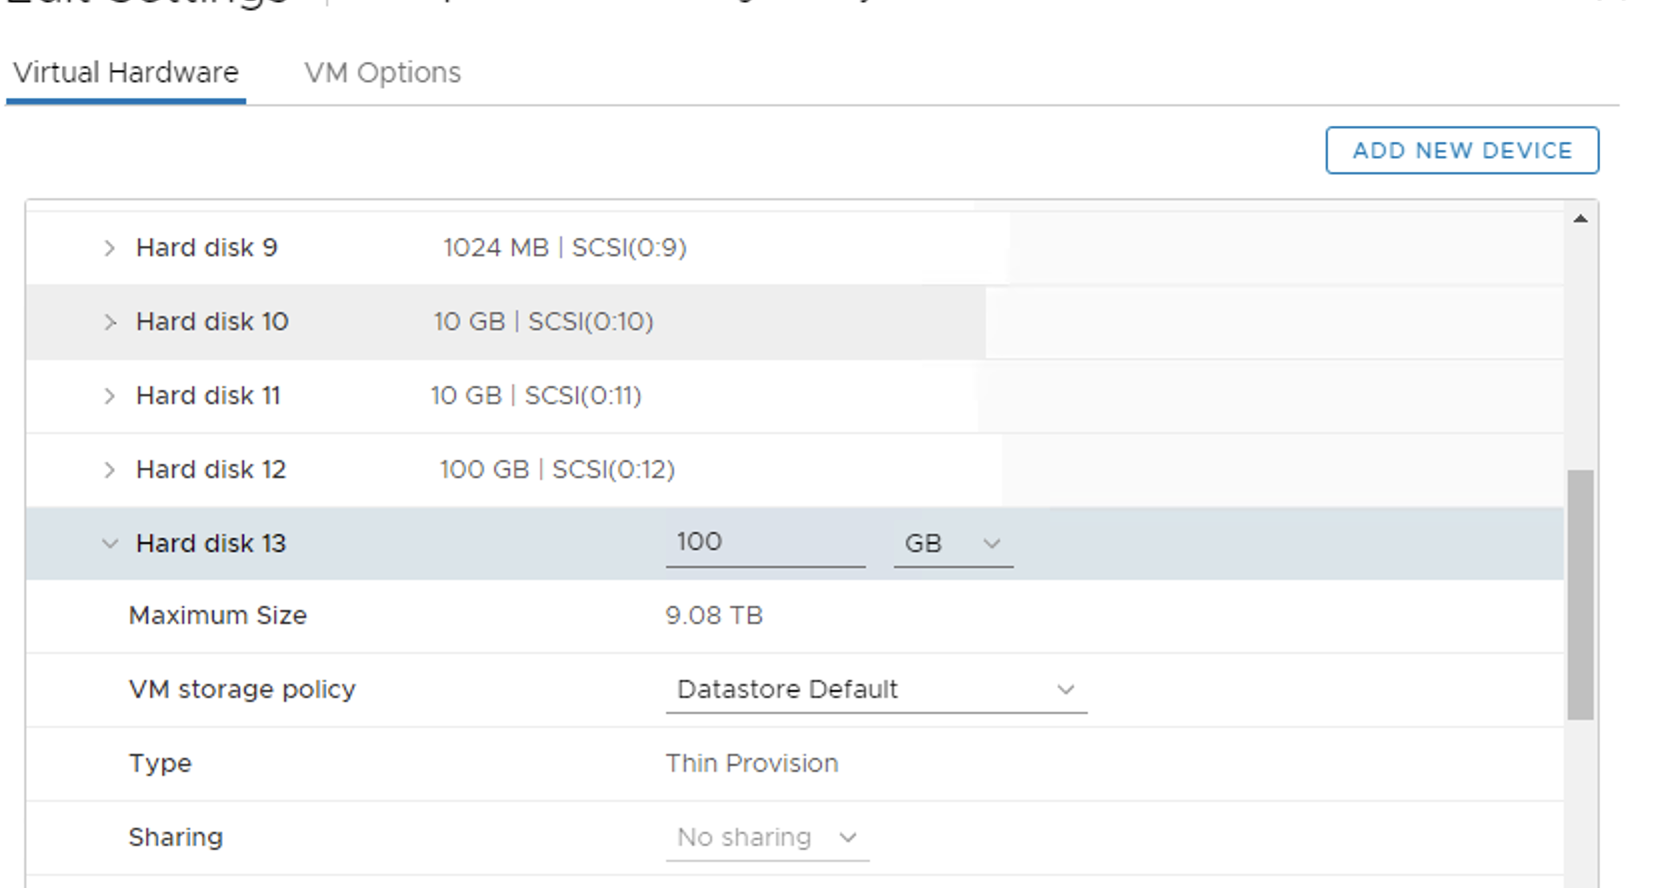
Fix for the vCenter /storage/archive storage partition full error

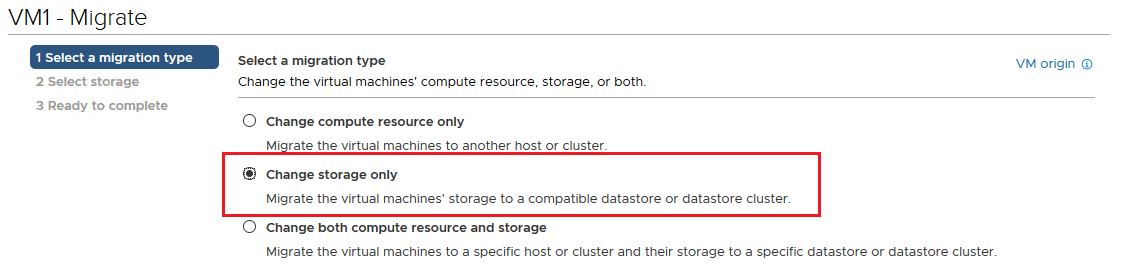
Once increased the partition size in the vCenter used the above steps.

In the SSH session to the vCSA, run the autogrow script “/usr/lib/applmgmt/support/scripts/autogrow.sh”

/usr/lib/applmgmt/support/scripts/autogrow.sh

Run the “df -h” command and verify the “/storage/archive” mount.

After all the process completed, verify the vSphere Client System Configuration Node Health is “Good” and verify the vCenter Server Appliance VAMI Health Status for Storage is “Good” .

This issue is an erroneous alarm that does not affect the operations of vCenter Server. But there is a permanent fix after installing the new version 6.7 Update VMware Downloads, there will no longer be warnings in the Health Status portion. There will be no alarm even if partition is 100% full – as this is by design, and has no impact on the running of the vCenter.


Install and setup own gitolite server in ubuntu

Gitolite is small, simple, and powerful. the backend application managing the fiddly bits that you configure using Git.  You can easily set up your own git server with as many users and as many repositories as can be stored in the space on your server. 

Gitolite client and server

First, let’s log in on the remote machine; the one you want to set up Gitolite on.

ssh root@git-server

Then install git:

sudo apt-get install git
sudo adduser git
sudo passwd -l git

It’s time to create the $HOME directory for the git user; then we will create SSH public key and adjust some permissions and directory ownership:

sudo ssh-keygen
sudo chmod 700 /home/git/.ssh
sudo chown -R git:git /home/git/

Let’s impersonate the git user, then clone and install Gitolite:

sudo su git -l
git clone https://github.com/sitaramc/gitolite ~/gitolite
mkdir ~/bin
~/gitolite/install -to ~/bin

Exit the git user shell and re-login to make the commands we just installed in ~/bin available to us.

Then setup Gitolite with your public key.

exit
sudo su git -l
gitolite setup -pk ~/.ssh/id_rsa.pub
exit
exit

Now let’s clone the gitolite-admin master repo:

git clone git@git-server:gitolite-admin ~/gitolite-admin

open the ~/gitolite-admin/conf/gitolite.conf file and put these lines to create a new repo and permissions,

repo my-repo
      RW+ = user1

Move your public key to the below location.

cd ~/gitolite-admin/keydir
vi user1.pub

And paste your public key details.

After that you’ll need to commit and push those changes to the remote gitolite-admin repo:

cd ~/gitolite-admin/
git add .
git commit -m "Add new repo, keys, access"
git push

That’s it

Cloning the new repo

Log in to your local machine and cloning the new repo (make sure your key permission in gitolite.conf to pull repo from remote machine)

git clone git@git-server:my-repo

Now you can add content to it and use git as usual.

Git Daemon


Next, we’ll set up a daemon serving repositories using the “Git” protocol. This is a common choice for fast, unauthenticated access to your Git data. Remember that since this is not an authenticated service, anything you serve over this protocol is public within its network.

In any case, the Git protocol is relatively easy to set up. Basically, you need to run this command in a daemonized manner:

$ git daemon --reuseaddr --base-path=/home/git/repositories/ /home/git/repositories/

The –reuseaddr option allows the server to restart without waiting for old connections to time out.

If you’re running a firewall, you’ll also need to punch a hole in it at port 9418 on the box you’re setting this up on.

Since systemd is the most common init system among modern Linux distributions, you can use it for that purpose. Simply place a file in /etc/systemd/system/git-daemon.service with these contents:

[Unit]
Description=Start Git Daemon
 
[Service]
ExecStart=/usr/bin/git daemon --reuseaddr --base-path=/home/git/repositories/ /home/git/repositories/
 
Restart=always
RestartSec=500ms
 
StandardOutput=syslog
StandardError=syslog
SyslogIdentifier=git-daemon
 
User=git
Group=git
 
[Install]
WantedBy=multi-user.target

Finally, you’ll run systemctl enable git-daemon to automatically start the service on boot, and can start and stop the service with, respectively, systemctl start git-daemon and systemctl stop git-daemon.

Next, you have to tell Git which repositories to allow unauthenticated Git server-based access to. You can do this in each repository by creating a file named git-daemon-export-ok.

$ cd /home/git/repositories/<your repo>
$ touch git-daemon-export-ok

The presence of that file tells Git that it’s OK to serve this project without authentication.

Done, Access the repo via the below command.

$ git clone git://10.14.48.30/toolchain.git


Convert Thick based volumes to Thin in VMware ESXi

You can save the disk space on the datastore, and the best advice is to convert thick provisioned to thin on VMware ESXi. All depend on your deployment requirements, just verify the usage and convert the disk format only if it is required. Before doing anything, read the VMware disk types

VMware disk types

Thick Provision Lazy Zeroed: is a disk that takes all of its space at the time of its creation, but this space may contain some old data on the physical media. This old data is not erased or written over, so it needs to be “zeroed out” before new data can be written to the blocks. This type of disk can be created more quickly, but its performance will be lower for the first writes due to the increased IOPS (input/output operations per second) for new blocks.

Thick Provision Eager Zeroed: is a disk that gets all of the required space still at the time of its creation, and the space is wiped clean of any previous data on the physical media. Creating eager zeroed disks takes longer, because zeroes are written to the entire disk, but their performance is faster during the first writes. This sub-type of thick-provisioned virtual disk supports clustering features, such as fault tolerance.

Thin Provision: Thin provisioning is another type of storage pre-allocation. A thin-provisioned virtual disk consumes only the space that it needs initially and grows with time according to demand.

Note: Before proceed, VMware recommends that you have a valid backup of the virtual machine and enough space to convert the virtual machine’s disk(s) from thin to thick.

How to convert VMware thick based volumes to thin

Convert using Inflate option

Verify VMware hard disk type:

  1. Log in to VMware ESXi. Click in the left menu on Virtual Machines. In the Virtual Machine list view, right-click on the VM and click Edit Settings.

Expand the Hard disk and check the Type

Vmware ESXi Thick provisioned virtual disk
ESXi Virtual Hardware Thick

  1. Shut down VM

Shut down the VM properly

  • Navigate to the datastore where the VM/ VM disk resides that was under Files
VM Datastore Files
  • Select the disk VMDK, and in the status bar above, you should find the Inflate option. The Inflate option converts the disk to thick provisioned.
VMware ESXi vmdk inflate option
  • Once you’ve selected the inflate option, you should be seeing a task getting created for the vmdk inflation at the bottom in the Recent Tasks tab. This task usually takes sometime to complete depending on the performance of the array. 
  • After the inflation task is completed, verify disk format again and do reload the .vmx file if it is not reflecting.

Notes:

  • If the Inflate option is grayed out, it indicates that the virtual machine is not powered off or that it is not thin provisioned.
  • There should be no snapshots and the conversion is performed on the base disk.

Convert using VMware Storage vMotion

To convert a virtual machine base disk from thick to thin provisioning by changing the datastore and performing storage vMotion: 

  • Right-click the virtual machine and select Migrate.
  • Select Change storage only and click Next.
  • In the next window, select the option configure per disk.
  • Select the disk in question which needs to undergo the modification.
VMware VM Migration Thin provision
  • Under Storage category select the destination datastore and under the Disk Format option select Thin Provision.
  • Validate the required VM Storage Policy and click Next.
  • Review the information on the Review Selections page and click Finish.

Convert using VMware ESXi command line

  • SSH into the host with the application Putty.
  • Navigate to the VM folder
  • [root@localhost:/vmfs/volumes/5e88aaf7-7ab335e2-4adc-1c697a0f86bd/vm-name1] ls -lh

 rw——-    1 root     root       60.0G Jan  5 22:04 vm-name1-flat.vmdk

-rw——-    1 root     root      264.5K Jan  5 22:04 vm-name1.nvram

-rw——-    1 root     root         450 Jan  5 21:58 vm-name1.vmdk

-rw-r–r–    1 root     root           0 Jan  5 21:58 vm-name1.vmsd

-rwxr-xr-x    1 root     root        3.2K Jan  5 22:04 vm-name1.vmx

-rw-r–r–    1 root     root      226.5K Jan  5 22:04 vmware.log

  • Clone the VMDK to a thin provisioned disk using vmkfstools

Use the command 

# vmkfstools -i vm-name1.vmdk -d thin vm-name1-thin.vmdk

List the files in the directory and verify that two files are created: vm-name1.thin-flat.vdmk and vm-name1.thin.vmdk.

  • Rename old flat file

Rename the old file with the command mv vm-name1-flat.vmdk vm-name1-flat.vmdk.old

  • Rename new flat file

Rename the thin flat file with the command mv vm-name1-thin-flat.vmdk vm-name1-flat.vmdk.

  • Now, go to the UI and Unregister VM from ESXi

This is necessary for the host to recognize the new disk type. Right-click VM > Unregister.

Click Yes.

Register VM in ESXi

  • Click on Create / Register VM.
  • Select Register an existing virtual machine. Click on Next.
  • Open the VM  vm-name1 and select the  vm-name1.vmx file. Click Select.
  • Click on Next.
  • Click Finish.

Verify hard disk type using the previous steps.

  • Start the VM

Start the VM and check that everything works as expected.

  • Delete unnecessary VMDK files

Clean up and remove the files. Run the command rm vm-name1-thin.vmdk && rm vm-name1-flat.vmdk.old.