Use the following steps to extend the root partition residing in a logical volume created with Logical Volume Manager (LVM) in a virtual machine running Red Hat/CentOS VMs. Increase the root partition size without server reboot in ESXi Host. You can do this simple steps to Increase VM root partition size in ESXi host.
If possible, take a complete backup of the virtual machine prior to making these changes.
Current root partition size in our test VM.
[root@localhost ~]# df -hFilesystem Size Used Avail Use% Mounted on
/dev/mapper/centos-root 98G 972M 97G 1% /
How to increase the root partition size for Red Hat/CentOS VMs in ESXi host ?
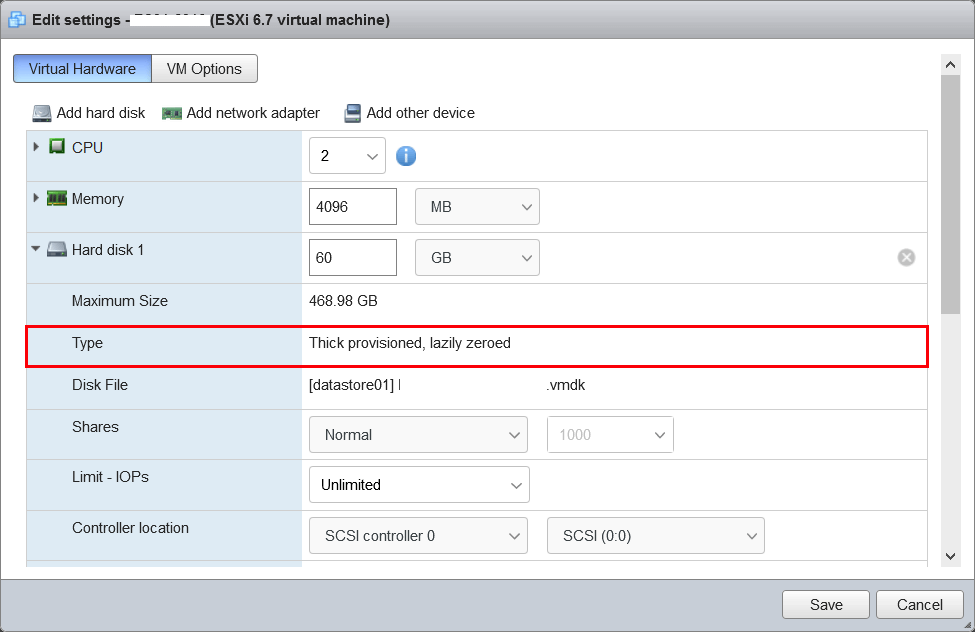
We are going to increase the size of the root partition to 200GB. Login your ESXi host and go to your VM Edit settings page and increase the harddisk1 size.

Once done, login into the VM and rescan the SCSI BUS.
First, check the name(s) of your scsi devices.
[root@localhost ~]# ls /sys/class/scsi_device/
Then rescan the scsi bus. Below you can replace the ‘0\:0\:0\:0′ with the actual scsi bus name found with the previous command. Each colon is prefixed with a slash, which is what makes it look weird.
[root@localhost ~]# echo 1 > /sys/class/scsi_device/0\:0\:0\:0/device/rescan
That will rescan the current scsi bus and the disk size that has changed will show up.
Check your new disk size
[root@localhost ~]# fdisk -lDisk /dev/sda: 214.7 GB, 214748364800 bytes, 419430400 sectors
Units = sectors of 1 * 512 = 512 bytes
Sector size (logical/physical): 512 bytes / 512 bytes
I/O size (minimum/optimal): 512 bytes / 512 bytes
Disk label type: dos
Disk identifier: 0x000b817c
Device Boot Start End Blocks Id System
/dev/sda1 * 2048 4196351 2097152 83 Linux
/dev/sda2 4196352 209715199 102759424 8e Linux LVM
Create new partition using fdisk
[root@localhost ~]# fdisk /dev/sda
Welcome to fdisk (util-linux 2.23.2).

Changes will remain in memory only, until you decide to write them.
Be careful before using the write command.
Command (m for help): n
Partition type:
p primary (2 primary, 0 extended, 2 free)
e extended
Select (default p):
Using default response p
Partition number (3,4, default 3):
First sector (209715200-419430399, default 209715200):
Using default value 209715200
Last sector, +sectors or +size{K,M,G} (209715200-419430399, default 419430399):
Using default value 419430399
Partition 3 of type Linux and of size 100 GiB is set

Command (m for help): w
The partition table has been altered!

Calling ioctl() to re-read partition table.

WARNING: Re-reading the partition table failed with error 16: Device or resource busy.
The kernel still uses the old table. The new table will be used at
the next reboot or after you run partprobe(8) or kpartx(8)
Syncing disks.
[root@localhost ~]# partprobe
[root@localhost ~]# fdisk -l
Disk /dev/sda: 214.7 GB, 214748364800 bytes, 419430400 sectors
Units = sectors of 1 * 512 = 512 bytes
Sector size (logical/physical): 512 bytes / 512 bytes
I/O size (minimum/optimal): 512 bytes / 512 bytes
Disk label type: dos
Disk identifier: 0x000b817c
Device Boot Start End Blocks Id System
/dev/sda1 * 2048 4196351 2097152 83 Linux
/dev/sda2 4196352 209715199 102759424 8e Linux LVM
/dev/sda3 209715200 419430399 104857600 83 Linux
Create a new PV from new partition
[root@localhost ~]# pvdisplay
--- Physical volume ---
PV Name /dev/sda2
VG Name centos
PV Size 98.00 GiB / not usable 3.00 MiB
Allocatable yes (but full)
PE Size 4.00 MiB
Total PE 25087
Free PE 0
Allocated PE 25087
PV UUID zQUIbS-RGYr-5XES-TwoT-i6SN-4Mv1-6mT2Lq
[root@localhost ~]# pvcreate /dev/sda3
Physical volume "/dev/sda3" successfully created
[root@localhost ~]# pvs
PV VG Fmt Attr PSize PFree
/dev/sda2 centos lvm2 a-- 98.00g 0
/dev/sda3 centos lvm2 a-- 100.00g 1020.00m
Attach the new PV to the existing root VG
[root@localhost ~]# vgdisplay— Volume group —
VG Name centos
System ID
Format lvm2
Metadata Areas 1
Metadata Sequence No 2
VG Access read/write
VG Status resizable
MAX LV 0
Cur LV 1
Open LV 1
Max PV 0
Cur PV 1
Act PV 1
VG Size 98.00 GiB
PE Size 4.00 MiB
Total PE 25087
Alloc PE / Size 25087 / 98.00 GiB
Free PE / Size 0 / 0
VG UUID nTczj7-qB13-nIdw-e2Lk-fHkh-lttZ-EBMAK6
[root@localhost ~]# vgextend centos /dev/sda3
Volume group "centos" successfully extended
[root@localhost ~]# vgsVG #PV #LV #SN Attr VSize VFree
centos 2 1 0 wz–n- 197.99g 100.00g
Extend the LV size
[root@localhost ~]# lvsLV VG Attr LSize Pool Origin Data% Meta% Move Log Cpy%Sync Convert
root centos -wi-ao—- 98.00g
[root@localhost ~]# lvextend -L+99G/dev/centos/root
Size of logical volume centos/root changed from 98.00 GiB (25087 extents) to 197.00 GiB (50431 extents).
Logical volume root successfully resized.

If you want to increase all 100% free disk, use this command
# lvextend -l +100%FREE /dev/centos/root
[root@localhost ~]# lvs
LV VG Attr LSize Pool Origin Data% Meta% Move Log Cpy%Sync Convert
root centos -wi-ao—- 197.00g
We are using XFS filesystem, so it must be actually extended using xfs_growfs. Using ‘-d’ will utilize the maximum available space.
[root@localhost ~]# xfs_growfs -d /
meta-data=/dev/mapper/centos-root isize=256 agcount=4, agsize=6422272 blks
= sectsz=512 attr=2, projid32bit=1
= crc=0 finobt=0
data = bsize=4096 blocks=25689088, imaxpct=25
= sunit=0 swidth=0 blks
naming =version 2 bsize=4096 ascii-ci=0 ftype=0
log =internal bsize=4096 blocks=12543, version=2
= sectsz=512 sunit=0 blks, lazy-count=1
realtime =none extsz=4096 blocks=0, rtextents=0
data blocks changed from 25689088 to 51641344
[root@localhost ~]# df -hFilesystem Size Used Avail Use% Mounted on
/dev/mapper/centos-root 197G 972M 196G 1% /
You can use the same way to add a new virtual disk to the existing VM and create a new PV instead of a new partition.
That’s it, You have done.
How to extend primary partition size in Linux for LVM
You have already created 4 partitions on your main drive but you want to extend the partition 4 with additional disk size. Once increased the size via the VMware instance Edit option and when you try to extend using fdisk <disk>, it will show error like below.
If you want to create more than four partitions, you must replace a primary partition with an extended partition first
How to extend disk size without creating a new partition?
Current partition details.
Device Boot Start End Blocks Id System
/dev/sda1 * 2048 1026047 512000 83 Linux
/dev/sda2 1026048 104857599 51915776 8e Linux LVM
/dev/sda3 104857600 314572799 104857600 83 Linux
/dev/sda4 314572800 524287999 104857600 83 Linux
use these steps to increase any primary partition, We will increase partition 4 (/dev/sda4)
Step 1
Rescan device to see the updated the new disk size.
[root@centos ~]#echo 1 > /sys/class/scsi_device/0\:0\:0\:0/device/rescan

[root@centos ~]#fdisk -l
Install growpart
[root@centos ~]#yum install cloud-utils-growpart -y
Step2
Extend partition4 with available disk space
[root@centos ~]# growpart /dev/sda 4
CHANGED: partition=4 start=314572800 old: size=209715200 end=524288000 new: size=419430367,end=734003167
Thats it, if you want to see the current available free space on the disk
[root@centos ~]#parted /dev/sda print free
Step 4
How to resize LVM physical volume with free space?
[root@centos ~]#pvresize /dev/sda4
Step 5
Extend LVM volume
[root@centos ~]#lvextend -l +100%FREE /dev/centos/root
Step 6
[root@centos ~]# partprobe
[root@centos ~]# xfs_growfs -d /
meta-data=/dev/mapper/centos-root isize=256 agcount=22, agsize=3045120 blks
= sectsz=512 attr=2, projid32bit=1
= crc=0 finobt=0
data = bsize=4096 blocks=64618496, imaxpct=25
= sunit=0 swidth=0 blks
naming =version 2 bsize=4096 ascii-ci=0 ftype=0
log =internal bsize=4096 blocks=5947, version=2
= sectsz=512 sunit=0 blks, lazy-count=1
realtime =none extsz=4096 blocks=0, rtextents=0
data blocks changed from 64618496 to 90832896
Done. Check with your size now.


