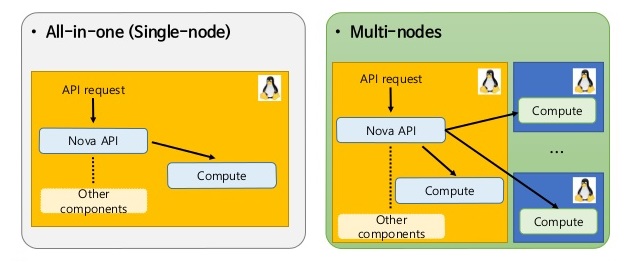
While single-node configurations are acceptable for small environments, testing or POCs most production environments will require a multi-node configuration for various reasons. As we know multi-node configurations group similar OpenStack services and provide scalability as well as the possibility for high availability. One of the great things about OpenStack is the architecture. Every service is decoupled and all communication between services is done through RESTful API endpoints. This is the model architecture for a cloud. The advantages are that we have tremendous flexibility in how to build a multi-node configuration. While a few standards have emerged there are many more possible variations and in the end, we are not stuck to a rigid deployment model. The standards for deploying multi-node OpenStack are as a two-node, three-node or four-node configuration. Add compute node on existing openstack using packstack installation.
You have installed OpenStack all-in-one with PackStack on your setup. In this tutorial, we will extend existing OpenStack installation (Controller node, Compute node) with new Compute-node1 on-line, without shutting down existing nodes. The easiest and fastest way to extend existing OpenStack Cloud on-line is to use Packstack. We will see how to add Compute Node on Existing OpenStack using Packstack.
Existing nodes:
Installed as all-in-one with packstack
Controller node: 10.10.10.20, CentOS72
Compute node: 10.10.10.20, CentOS72
New Compute node:
Compute-node1 : 10.10.10.21, CentOS72
add additional compute node on my existing all-in-one packstack setup.
Step 1:
Edit the original answer file provided by packstack. This can usually be found in the directory from where packstack was first initiated.
Log in to existing all-in-one node as root and backup your existing answers.txt file:
# cp /root/youranwserfile.txt /root/youranwserfile.txt.old
# vi /root/youranwserfile.txt
Change the value for CONFIG_COMPUTE_HOSTS from the current to the value of your second compute host IP address and update exclude current node IP in EXCLUDE_SERVERS.
Ensure you have set correct IPs in EXCLUDE_SERVERS parameter to prevent existing nodes from being accidentally re-installed
My changes on this node
EXCLUDE_SERVERS=10.10.10.20
CONFIG_COMPUTE_HOSTS=10.10.10.21
Here I have added my existing compute node ip 10.10.10.20 to EXCLUDE_SERVERS and replaced the CONFIG_COMPUTE_HOSTS with my new compute node ip 10.10.10.21.
If you have multiple IPs in existing node then mention those ips also in EXCLUDE_SERVERS using comma(10.10.10.20, 10.10.10.19).
optional:
If you have different network card uses, update your network name. example from lo to eth1
CONFIG_NOVA_COMPUTE_PRIVIF
Step 2:
Prepare your new compute node for the OpenStack deployment.
– stop NetworkManager service
– disable selinux
– allow ssh access from existing node
Step 3:
That’s it. Now run packstack again on the controller node.
# packstack --answer-file=/root/youranwserfile.txt
Installing:
Clean Up [ DONE ]
[email protected]'s password:
Setting up ssh keys [ DONE ]
Discovering hosts' details [ DONE ]
Adding pre install manifest entries [ DONE ]
Installing time synchronization via NTP [ DONE ]
Preparing servers [ DONE ]
Checking if NetworkManager is enabled and running [ DONE ]
Adding OpenStack Client manifest entries [ DONE ]
Adding Horizon manifest entries [ DONE ]
Adding Swift Keystone manifest entries [ DONE ]
Adding Swift builder manifest entries [ DONE ]
Adding Swift proxy manifest entries [ DONE ]
Adding Swift storage manifest entries [ DONE ]
Adding Swift common manifest entries [ DONE ]
Adding Provisioning manifest entries [ DONE ]
Adding Provisioning Glance manifest entries [ DONE ]
Adding Provisioning Demo bridge manifest entries [ DONE ]
Adding Gnocchi manifest entries [ DONE ]
Adding Gnocchi Keystone manifest entries [ DONE ]
Adding MongoDB manifest entries [ DONE ]
Adding Redis manifest entries [ DONE ]
Adding Ceilometer manifest entries [ DONE ]
Adding Ceilometer Keystone manifest entries [ DONE ]
Adding Aodh manifest entries [ DONE ]
Adding Aodh Keystone manifest entries [ DONE ]
Adding Nagios server manifest entries [ DONE ]
Adding Nagios host manifest entries [ DONE ]
Copying Puppet modules and manifests [ DONE ]
Applying 10.10.10.21_prescript.pp
10.10.10.21_prescript.pp: [ DONE ]
Applying 10.10.10.21_nova.pp
10.10.10.21_nova.pp: [ DONE ]
Applying 10.10.10.21_neutron.pp
10.10.10.21_neutron.pp: [ DONE ]
Applying 10.10.10.21_nagios_nrpe.pp
10.10.10.21_nagios_nrpe.pp: [ DONE ]
Applying Puppet manifests [ DONE ]
Finalizing [ DONE ]

**** Installation completed successfully ******

Additional information:
* Time synchronization installation was skipped. Please note that unsynchronized time on server instances might be problem for some OpenStack components.
* File /root/keystonerc_admin has been created on OpenStack client host 10.10.10.20. To use the command line tools you need to source the file.
* To access the OpenStack Dashboard browse to http://10.10.10.20/dashboard .
Please, find your login credentials stored in the keystonerc_admin in your home directory.
* To use Nagios, browse to http://10.10.10.20/nagios username: nagiosadmin, password: e68a1a992d2b44fd
* The installation log file is available at: /var/tmp/packstack/20161118-074021-mhbsqe/openstack-setup.log
* The generated manifests are available at: /var/tmp/packstack/20161118-074021-mhbsqe/manifests
Step 4 :
Verify your new compute node is include with existing controller.
[root@openstack-test ~]# source /root/keystonerc_admin
[root@openstack-test ~(keystone_admin)]# nova-manage service list
Binary Host Zone Status State Updated_At
nova-osapi_compute 0.0.0.0 internal enabled XXX None
nova-metadata 0.0.0.0 internal enabled XXX None
nova-cert openstack-test.gsintlab.com internal enabled :-) 2016-11-19 12:59:57
nova-consoleauth openstack-test.gsintlab.com internal enabled :-) 2016-11-19 12:59:57
nova-scheduler openstack-test.gsintlab.com internal enabled :-) 2016-11-19 12:59:55
nova-conductor openstack-test.gsintlab.com internal enabled :-) 2016-11-19 12:59:56
nova-compute openstack-test.gsintlab.com nova enabled :-) 2016-11-19 12:59:56
nova-compute test-compute2.gsintlab.com nova enabled :-) 2016-11-19 13:00:04
That’s it.
Add Additional Storage Node
It shows as unsupported version, anyway change CONFIG_UNSUPPORTED=y on your /root/youranwserfile.txt file and updated CONFIG_STORAGE_HOST with your new storage node.
# (Unsupported!) Server on which to install OpenStack services# specific to storage servers such as Image or Block Storage services.
CONFIG_STORAGE_HOST=10.10.10.21


